
Close Window
Thermaltake Kandalf LCS case
| Author: | Jason Dumbaugh |
| Date: | 2008.05.20 |
| Topic: | Cases |
| Provider: | Thermaltake |
| Manufacturer: | Thermaltake |
| Author: | Jason Dumbaugh |
| Date: | 2008.05.20 |
| Topic: | Cases |
| Provider: | Thermaltake |
| Manufacturer: | Thermaltake |


With processors having such aggressive speeds these days, there is sure to be a build-up of heat. Heatsinks are increasing in size and using better material, but for the overclockers of the world, liquid cooling is still a necessity. Some cases are so small that a custom liquid cooling system could take up 50% of the case, leaving close to no room for components or cables. Someone shoud just come up with an extr emely roomy case that has a built in liquid cooling system. Thermaltake says "We should." I introduce to you, the Kandalf LCS.
Towering at approximately 21.25 inches tall, the Kandalf LCS case comes in either black or white. The front of the case is made of a thick brushed aluminum.
| Model | VD4000BWS |
| Case Type | Super Tower |
| Side Panel | Transparent Window |
| Net Weight | 21.92 kg |
| Dimension (H*W*D) | 540.0 mm x 220.0 mm x 640.0 mm |
| Cooling System | ‧Rear (exhaust) : 120x120x25mm blue LED fan, 1300rpm, 17dBA; 90x90x25mm, 1800rpm, 19dBA ‧Top (exhaust) : 90x90x25mm, 1800rpm, 19dBA |
| Drive Bays -Front accessible -Internal |
Up to 9 x 5.25”, 2 x 3.5”, 6 x 3.5" |
| Material | Chassis:1.0mm SECC Front door: Aluminum |
| Color | Black |
| Expansion Slots | 7 |
| Motherboards | Micro ATX, ATX, Extend ATX, BTX |
| PSU | Standard ATX PSII |
| I/O Ports | USB 2.0 x 2, IEEE 1394 x 1, Audio & Speaker ports |
| BTX Upgrade Kit | SRM/Rear plate(option: A9358) |
| Liquid Cooling System | ‧All-in-one waterblock : For Intel BTX platform, P4 775 and AMD K8 ‧Performance radiator : (A) Dimension of radiator : H 407 x W 120 x D 35 mm (B) Three 1300RPM 120mm fans ‧P500 liquid pump : Power DC 12V liquid pump (500L/hr) ‧Reservoir : Contains 350 c.c. of liquid capacity, easy to refill ‧Water tube : Transparent UV tube (3/8”) & industrial-grade rubber tube. |
| Container Load | 20’-172,40’-361,40’HQ-412 |
 |
Aggressive front door design Mysterious light in the dark |  |
High expandability: up to nine 5.25” drive bay 5.25” to 3.5” adaptor |
 |
Free-flowing design |  |
Removable dust filter |
 |
Removable Power & Reset Switches |  |
Dual USB2.0, IEEE1394, Audio & Speaker ports (support Intel HD Audio connector) |
 |
Pre-drilled tube fittings for future upgrades |  |
Bushing to protect water tubes from scrape |
 |
Screw-less kit for 5.25” drive bays | 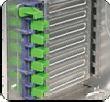 |
Screw-less for PCI devices |
 |
Removable HDD cage |  |
Fan brackets for easy remove and install |
 |
Accessory box for any small items | 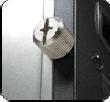 |
Thumbscrews for easy removal |
 |
Retractable foot stand |
 |
Side panel lock for security |
 |
Anti-EMI |  |
PSU support for stability |
 |
Spared space to route cables, improve airflow and eliminate clutter | ||
When we first look at the box, we are greeted with an attractive case that displays key points on the back. After opening the case, we see a lot of styrofoam packaging, as well as a protective bag for the case. After lifting the case out of the box, we note that the case weighs 48 lbs empty. While this seems like a heavy case (and it is for being empty), we must keep in mind the sheer size of this thing.


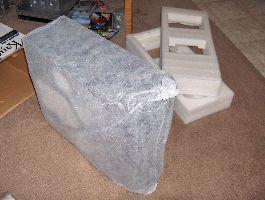
After setting it on the table, we can get a better look at the case. Take note that Thermaltake has taped the corners to prevent dings, as well as placed film over the side glass to prevent scratches. I think the window panel could use one of those 250mm fans Thermaltake uses on their Armor cases, but I'm sure that'll be thrown in for revision two. I'll note the window is very attractive, and provides enough glass area for you to see any lights in the case, including some that may be on the power supply (like mine has).


Moving on to the back edge of the case, we see the power supply tucked into the top corner, next to an 80mm fan. This is used as an exhaust fan for the heat from the upper hard drive cage. Below that, we have a standard 120mm blue LED fan, as well as 7 PCI slots.

Looking at the top of the case, we see there are plenty of vent holes for hot air to escape, as well as a circular touch-open hatch. This hatch houses 1 x firewire port, 2 x USB ports, 1 x microphone jack, and 1 x headphone jack.

Now let's have a look at the front of the Kandalf LCS ...
The front of the Kandalf LCS is the best part of the entire case. With smooth lines and a beautiful chrome Thermaltake logo, it's an immediate eye-catcher. After swinging the front panel open, we're greeted with the exhaust portion of 3 x 120mm fans (2 black, 1 blue LED) rated at 1300RPM. These are affixed to the front radiator and have attractive Thermaltake fan grilles. I would also like to make a note at this point of the set of magnets which hold the two front panels together. There are three magnets, evenly spaced out among the board, but I noticed when laying the case down that they can fall out! Once you find the magnet on the floor it can be slid back into place until standing it upright again.


Slippery magnets
Drive bays are not skimped, as there are 9 x 5.25" bays, which includes a moveable storage tray for CDs, screwdrivers, and goodies. This tray is large enough for paper sleeved CDs, but not the plastic cases. At the absolute bottom is a bay with a plastic grommet system which keeps the liquid cooling tubes from being scratched or cut. At the top of the nine bays, there is a small bay that includes the power and reset buttons, as well as the HDD and power lights. This bay is also moveable.


The window side panel is held on by a rather different format. There is a push-button locking system on the top and bottom, and the top can be locked with a key. Once the buttons are depressed, the panel swings out and then pulls off.

Now we can get a good look inside of Thermaltake's Kandalf LCS . You'll immediately see the rails for the power supply and the upper HDD enclosure.


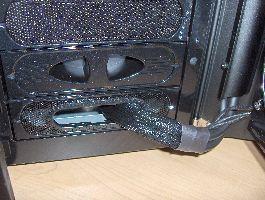
Looking at the back of the case, we see the rear 120mm fan and the 7 PCI slots. The screw-less PCI snaps can be seen. I will point out something with these snaps later, so don't forget! When you look at the front of the case, you can see the protrusion of the liquid cooling system tubes from the front, as well as the back of the storage unit and the front HDD rack. This HDD rack has mounts for its own 120mm fan, and is removable like the rear one.


As we continue to open the packaging, we find a rather large box. After opening the box, we find two 500cc bottles of green Thermaltake UV reactive coolant, a roll of 3/8" green UV reactive tubing, a copper water block, and a 350cc pump/reservoir combo.

Further investigation yields another bag with a 80mm roof-mountable fan, a power supply support bracket, and a bag of screws.

Today we plan on installing a supercomputer inside of this monster. The following parts will be reviewed separately as well.
Now let's install them in the case!
First we started with our power supply - the Tagan BZ900. We start by taking off the motherboard side panel, and removing the rear HDD cage. The power supply was quite difficult for me to install, though I've heard others say it was quite easy. It took me literally 20 minutes to muscle it in, and I'm afraid I scratched the PSU a couple of times. There really isn't any room to slide it in, due to the bent rod below the PSU, and the low clearance on the adjacent panel. I cut my finger pretty good on some stray metal and had to take a "clotting and first aid break." I finally got it installed though...


Since the HDD cage was out, we installed the hard drive. This was quite painless as it only requires 2 accessory screws on each side. The cage locks back into the chassis easily.

After taking the CPU water block and hardware out of the box, we assembled it as shown in the instructions. This proved to be quite simple, though the water block doesn't seat too stable. The copper motherboard standoffs were installed in the case and the motherboard was seated and screwed down. This was also quite simple. Normally, I would test a liquid cooling system for leaks before installing any hardware, but the ASUS Striker II motherboard has a liquid cooled northbridge, so I decided to throw it in the loop. Why would products this nice leak anyway?...


We decided to install the nVidia 7800GTX next. This proved to be a LOT harder than expected, since the tool-less PCI brackets won't lock down over a card with a straight edge. Once we unscrewed the tool-less brackets, we noticed that the PCI bracket screw holes on the Kandalf were too far from the motherboard! After torquing the card and pushing on the case, we finally got the card screwed in...with some unwanted stress on the video card.


After that matter, it was on to the DVD drive. This proved to be quite simple due to Thermaltake's patented tool-less bay locks. All you have to do is squeeze the tabs and lift up on the plastic piece. Slide the drive in, push the plastic piece down, and un-squeeze. Done!

Next, I decided to install the power and reset switches, speaker, and HDD and power indicator LEDs. These wires are located in the top of the bay panels, and proved to be very tricky little buggers to pull out. All 5 cables were looped in a circle and tied. Reaching up into the case to pull them out, I cut my finger again....this isn't looking too good for chances of tetanus.


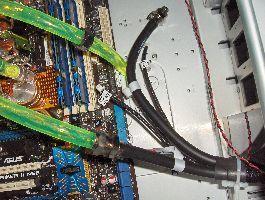
By this point, my fingers were saying "we're hurting, and now we have to install a liquid cooling system?" I had already spent 4 hours on this installation, but went on routing the tubing anyway. Thermaltake has patented a quick connector for liquid cooling tubing. A cap is unscrewed, the tube is fed through the cap, and then screwed in place. This provides a very nice seal which is essentially leak-proof. I used small pieces of tubing to run from the CPU to the northbridge, which then used ASUS's form of tube mounting. This did not seem as fool-proof as I'd hoped, but it seemed tight.

There is a loop of tubes at the bottom of the case which includes the tube to the reservoir, the tube from the CPU, and the three fan connectors from the front. All of the tubes were plugged in the way the manual told us to, and now we mount the reservoir/pump. Following the instructions seemed easy, but my pump doesn't line up with the holes on the floor of the case! I settled for two of the 4 screws since it was late at night.

After finally getting the tubing installed, I filled it up with coolant and plugged only the pump into the power supply to let the coolant move through the tubes.


When I woke up in the morning, I was greeted with:
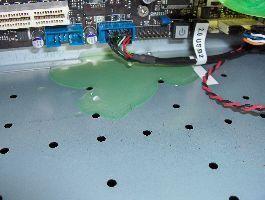
Turns out the ASUS connectors were loose! Later that day, they broke in half and I had ~500ccs of coolant all over my table. This delayed plugging in my system to install Windows...
After all was said and done, it is in fact a gorgeous case. Here are some night-time pictures of the case, and I must say it is quite nice looking. The first two pictures are from Thermaltakeusa.com


Well my friends, it's time for our conclusion. While it took 20 minutes of muscling a power supply into a keyhole, 4 hours of installation the first night, two bloody fingers, and a 500cc liquid cooling spill, this is by far the nicest looking and roomiest case I've ever seen. Most cases sound like wind tunnels as well. Surprisingly, the Kandalf, with its 4 x 120mm 1300RPM fans and liquid cooling pump, is one of the quietest computers I've ever heard. There is enough space inside to fit any motherboard you wish, though the motherboard tray isn't removable.
A standard liquid cooling system will cost you over $100, but the Thermaltake Kandalf LCS definitely delivers a very nice system in this sturdy aluminum case. You'll notice intricate features splashed all over the case, and I'm sure Thermaltake will improve their next of kin to be even better than this one. Priced at $279.99 from Newegg.com, the Kandalf case can be purchased quite reasonably. I've put a list of pros and cons together for this case. None of the cons are very big issues, though I must make note of them because I was surprised these flaws fell under Thermaltake's radar.
