Grip
One issue that comes up with any mouse, gamer-oriented or not, is grip. Using a mouse means hanging on to it in a way that allows for movement and button pressing. After much research, Razer has classified three main styles of grip:
- Palm grip: the hand lies flat along the body of the mouse; button presses are accomplished by pushing down with the whole finger. Motion is done with the whole arm, with the elbow as the pivot. This grip favors large, contoured mice with a weighty base, to avoid excessive sliding.
- Claw grip: the mouse is gripped with the tips of the fingers and thumb, with the back end resting against the palm of the hand. Large movements are made from the elbow; fine movements originate with the wrist. This style favors flatter mice, with a raised hump at the back to rest against the heel of the palm.
- Fingertip grip: the mouse is gripped solely with the tips of the fingers. Large movements originate from the wrist, fine movements from the fingertips. This style favors smaller, flatter mice, or mid-sized mice for people with large hands. As a point of reference, the standard Dell courtesy mouse that comes with every budget PC is shaped for this grip.
The Salmosa was designed with the fingertip grip in mind, though people with small hands may find themselves using the claw grip instead. In practice, I found it hard to find a grip I was comfortable with. Given that I have large hands, and am accustomed to large mice like the Razer DeathAdder or the Logitech G9, this is perhaps unsurprising. Eventually, I found myself settling into a sort of hybrid grip: fingertip when fine-detailed movements were needed, claw grip otherwise.
Installation and Set-Up
Getting the Salmosa to work is about as simple as it gets: plug it in, wait for the OS to detect and initialize drivers, and away you go. Should you want a bit more control over your experience, the Salmosa comes with a CD that contains not custom drivers, but a driver downloader program that fetches the latest drivers from Razer’s support website.
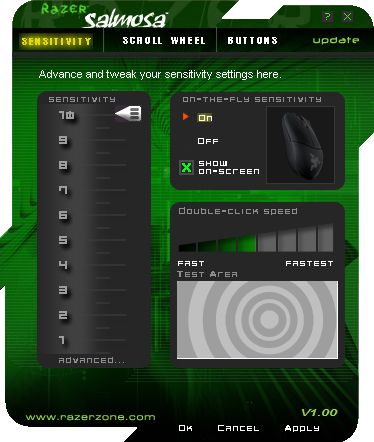
The driver software installs very quickly, and opening the Customizer first presents you with this window. The slider on the left controls overall pointer sensitivity, while the green horizontal meter on the right controls double-click speed. The bullseye on the lower right gives you a quick way to test your double-click settings, it will ‘shatter’ if you’ve clicked fast enough to count. The on-the-fly sensitivity box in the upper right lets you choose whether or not to allow for in-game changes to sensitivity. This is accomplished by holding a mouse button bound to the sensitivity function and rolling the scroll wheel. Given that the Salmosa has no extra buttons, this feature seems largely impractical, unless you’re willing to give up mouse3 to the task.
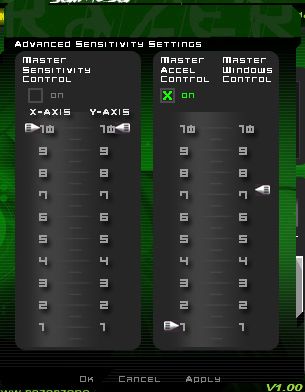
Clicking on the ‘advanced’ button beneath the pointer sensitivity slider brings you to this window, which gives you some more fine-grained control of things. Here you can set movement sensitivity separately for the x-axis (left-right movement) and y-axis (up-down movement) separately, if you are so inclined. Direct control of the pointer acceleration factor and Windows pointer speed can also be had here. The Windows pointer speed control seems to be here largely for convenience’s sake, but being able to set acceleration directly is essential for any gamer. With Windows’s default high acceleration factor, rapid aiming adjustments in FPS games can overshoot where you intended to go. For consistency’s sake, setting the acceleration to 0 will ensure that moving the mouse x distance will always result in y amount of pointer motion, regardless of how quickly you do it. Afterward, setting sensitivity becomes much easier.

The second tab along the top brings us to the scroll wheel settings. Here we can set how many lines to scroll with each notch in the wheel, as well as whether to try to enforce universal scrolling or not. Pretty basic stuff.
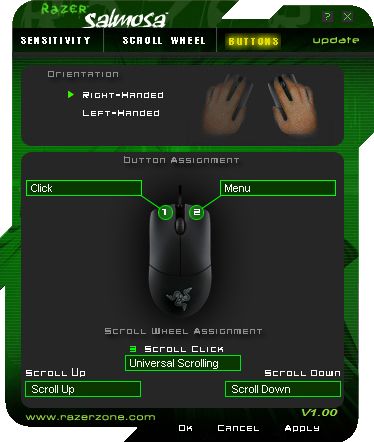
The third tab along the top brings us to what is usually a very important setting for gaming mice: button mappings. In the case of the Salmosa, however, few will want to do much beyond possibly swapping left and right mouse buttons for southpaw gaming. Binding mouse1 to anything but its default is a recipe for disaster, and remapping mouse2 is similarly unwise. Some may want to bind mouse3 to something else, but this is usually accomplished easily enough in-game.
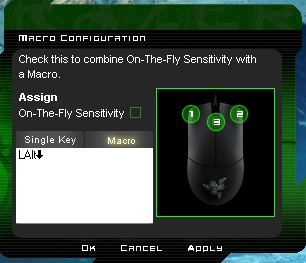
Should you desire to do so, Razer’s drivers allow you to bind single keyboard keys or macros to a mouse button. Two main problems make this somewhat frustrating. The first is that while the software will indeed pick up whatever keys you press—for the most part—it makes no attempt to ‘capture’ input while doing so. The upshot of this is that if the key sequence you pressed causes something to happen elsewhere, like Alt+Tab, it will not be captured correctly. The second problem is that the macro editor does not let you insert delays between keypresses, or even control the playback rate. Every key-press and release in your macro will always get replayed at top speed, which is not always desirable behavior.

[…] Click the icon, or enter email address to receive reviews via email! We will not share your info! When I hear the words gaming mouse, two thoughts come to mind. Ooh, thats interesting, is followed …Read more… […]
[…] TechwareLabs gets its hands on the Razer Salmosa Gaming Mouse […]