Introduction:
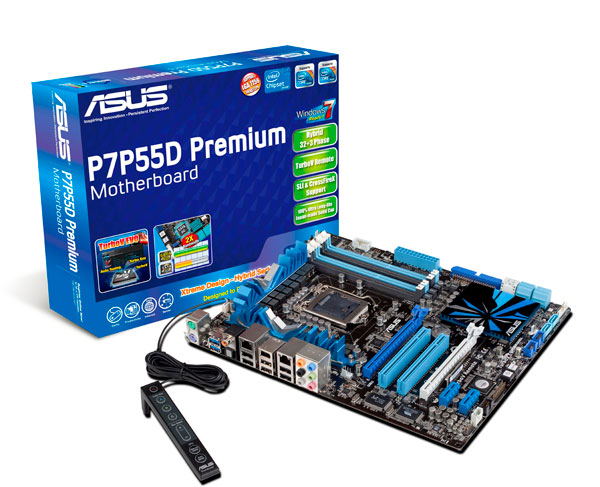
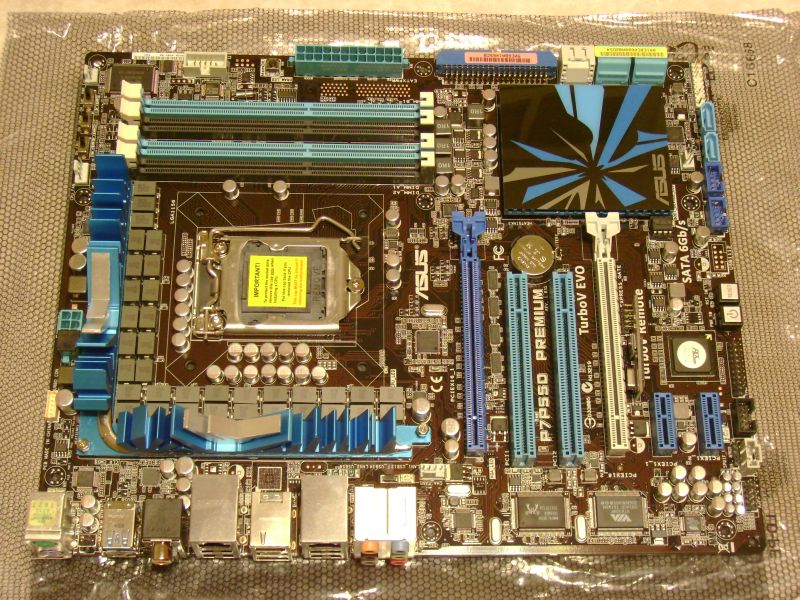
With the advent of Intel releasing the LGA 1156 socket ASUS has launched nothing short of 17 different socket 1156 motherboards based on the newer P55 chipset. We decided to take this time to look at one of the more elite socket 1156 motherboards from ASUS, the P7P55D featuring SATA III, SLI and Crossfire, a remote for overclocking and a 48 Hybrid Phase cooling design. All together the P7P55D looks to be a mighty board but does it have true substance or is it just another board for ASUS to add to the market? Join me while I investigate and test the new ASUS the P7P55D Premium.
Specs:
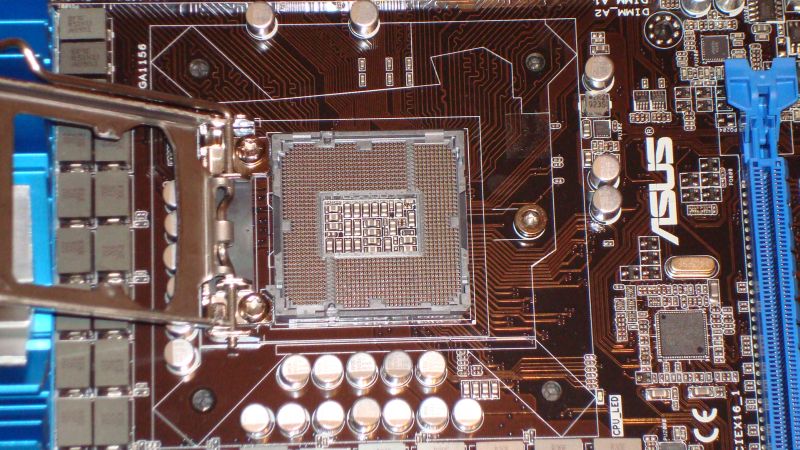
| CPU | Intel® Socket 1156 Core™ i7 Processor/Core™ i5 Processor Supports Intel® Turbo Boost Technology |
| Chipset | Intel® P55 Express Chipset |
| Memory | 4 x DIMM, Max. 16 GB, DDR3 2200(O.C.)*/1600/1333/1066 Non-ECC,Un-buffered Memory Dual Channel memory architecture Supports Intel® Extreme Memory Profile (XMP) |
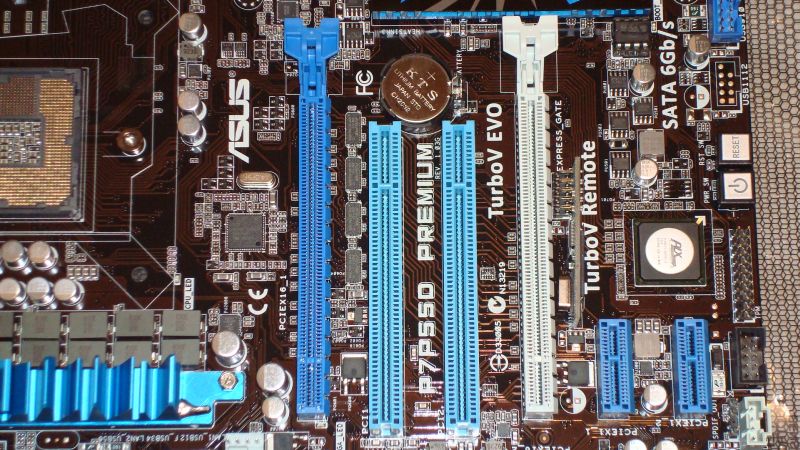
| Expansion Slots | 2 x PCIe 2.0 x16 (single at x16 or dual at x8/x8 mode) 2 x PCIe 2.0 x1 (2.5GT/s) 2 x PCI |
| Multi-GPU Support | Supports NVIDIA® Quad-GPU SLI™ Technology Supports ATI® Quad-GPU CrossFireX™ Technology |
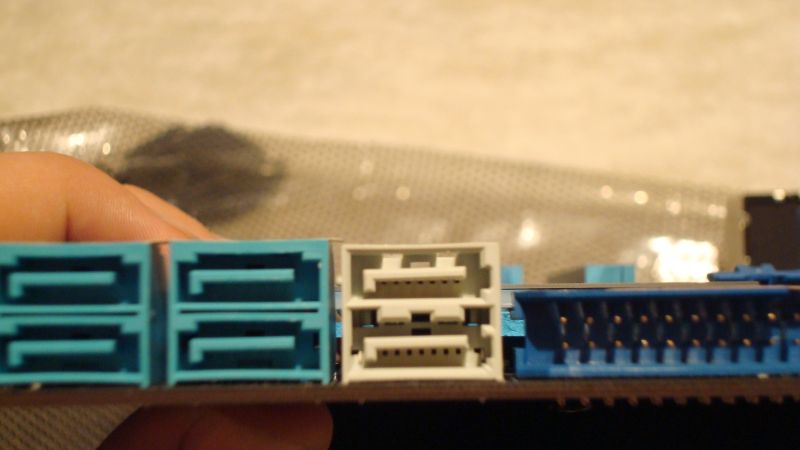
| Storage | Intel® P55 Express Chipset built-in 6 xSATA 3.0 Gb/s ports Intel Matrix Storage Technology Support RAID 0,1,5,10 JMicron® JMB368 PATA controller 1 xUltraDMA 133/100/66 for up to 2 PATA devices Marvell® 88SE9123 SATA controller: – 2 x SATA 6.0 Gb/s ports (gray) |
| LAN | Dual Gigabit LAN controllers Realtek® 8112L / 8110SC Gigabit LAN controller featuring AI NET2 and Teaming |
| Audio | VIA® VT2020 10-Channel High Definition Audio CODEC – Absolute Pitch BD192/24 featuring ENVY HD – DTS Surround Sensation UltraPC – Supports Jack-Detection, Multi-streaming, Front Panel Jack-Retasking – Coaxial / Optical S/PDIF out ports at back I/O |
| IEEE 1394 | VIA® 6308P controller supports 2 x 1394a ports (one at mid-board; one at back panel) |
| USB | 12 USB 2.0/1.1 ports (4 ports at mid-board, 8 ports at back panel) |
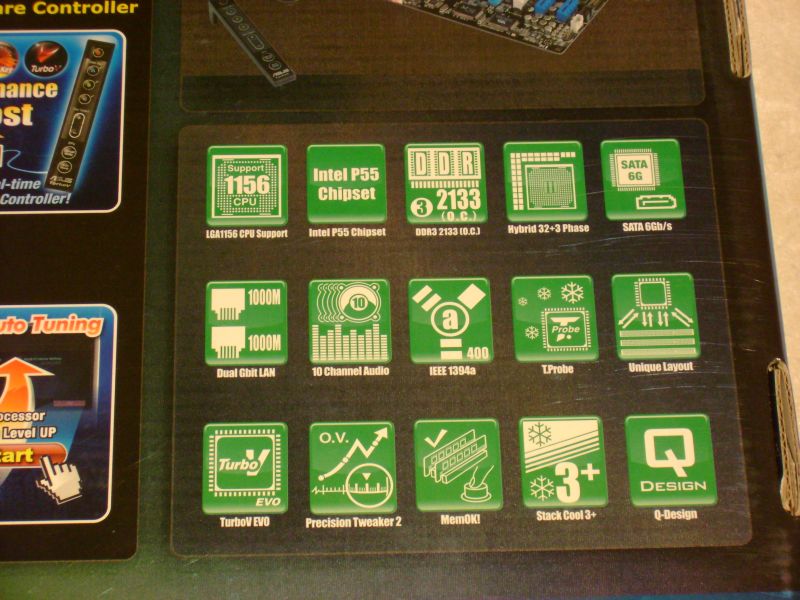
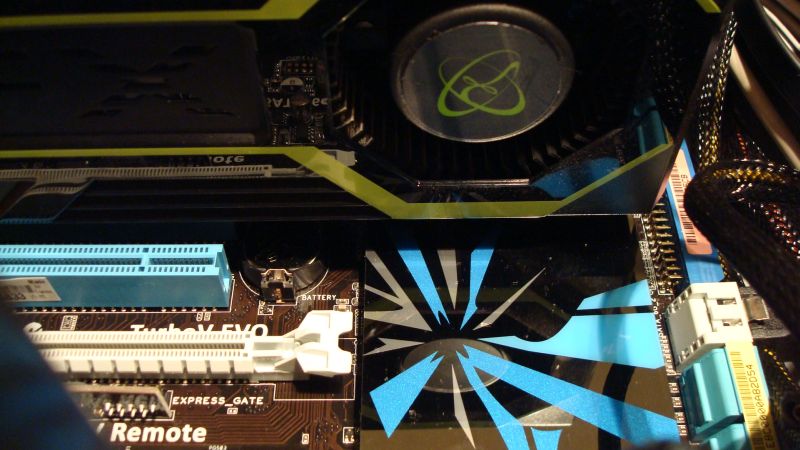
| ASUS Unique Features | ASUS Hybrid Processor – TurboV EVO – Auto Tuning, TurboV and Turbo Key – TurboV Remote ASUS 48 Hybrid Phase* – T.Probe Technology for Active Cooling – 32+3 Phase Power Design – 100% Ultra Long Life Japan-Made Solid Capacitors *48 Hybrid Phase = 32+3 Phase x T.Probe ASUS Hybrid OS – Express Gate SSD ASUS Xtreme Design ASUS Exclusive Features – MemOK! – ASUS EPU ASUS Quiet Thermal Solution – ASUS Fanless Design: Heat-pipe solution – ASUS Fanless Design: Stack Cool 3+ – ASUS Fan Xpert ASUS Crystal Sound – ASUS Noise Filter ASUS EZ DIY – ASUS Q-Shield – ASUS Q-Connector – ASUS O.C. Profile – ASUS CrashFree BIOS 3 – ASUS EZ Flash 2 – ASUS MyLogo 2 – Multi-language BIOS ASUS Q-Design – ASUS Q-LED (CPU, DRAM, VGA, Boot Device LED) – ASUS Q-Slot – ASUS Q-DIMM |
| Overclocking Features | Precision Tweaker 2 – vCore: Adjustable CPU voltage at 0.00625V increment – vIMC: Adjustable IMC voltage at 0.00625V increment – vDRAM Bus: 81-step DRAM voltage control – vPCH: 2-step chipset voltage control – vCPU_PLL: 4-step reference voltage control SFS (Stepless Frequency Selection) – PCI Express frequency tuning from 100MHz up to 200MHz at 1MHz increment – Internal Base Clock tuning from 80MHz up to 500MHz at 1MHz increment Overclocking Protection – ASUS C.P.R.(CPU Parameter Recall) |
| Back Panel I/O Ports | 1 x IEEE 1394a 2 x LAN(RJ45) port 8 x USB 2.0/1.1 10 -Channel Audio I/O 1 x PS/2 Keyboard port (Purple) 1 x PS/2 mouse port (Green) 1 x Coaxial S/PDIF Output 1 x Optical S/PDIF Output 1 x Clear CMOS switch |
| Internal I/O Connectors | 2 x USB connectors support additional 4 USB ports 1 x IDE connector 1 x TPM connector 1 x IEEE 1394a connector 1 x CPU Fan connector 1 x Power Fan connector 1 x COM connector 6 x SATA 3.0Gb/s connectors (blue) 2 x SATA 6.0Gb/s connectors (gray) 2 x Chassis Fan connector (1×4-pin, 1×3-pin) Front panel audio connector 1 x S/PDIF Out Header 1 x CD audio in 1 x 24-pin ATX Power connector 1 x 8-pin ATX 12V Power connector System Panel(Q-Connector) 1 x TURBO_CON header (for TurboV Remote) 1 x MemOK! button 1 x Power on switch 1 x Reset switch |
| BIOS | 16 Mb Flash ROM , AMI BIOS, PnP, DMI2.0, WfM2.0, SM BIOS 2.5, ACPI 2.0a, Multi-language BIOS, ASUS EZ Flash 2, ASUS CrashFree BIOS 3 |
| Manageability | WfM 2.0,DMI 2.0,WOL by PME,WOR by PME,PXE |
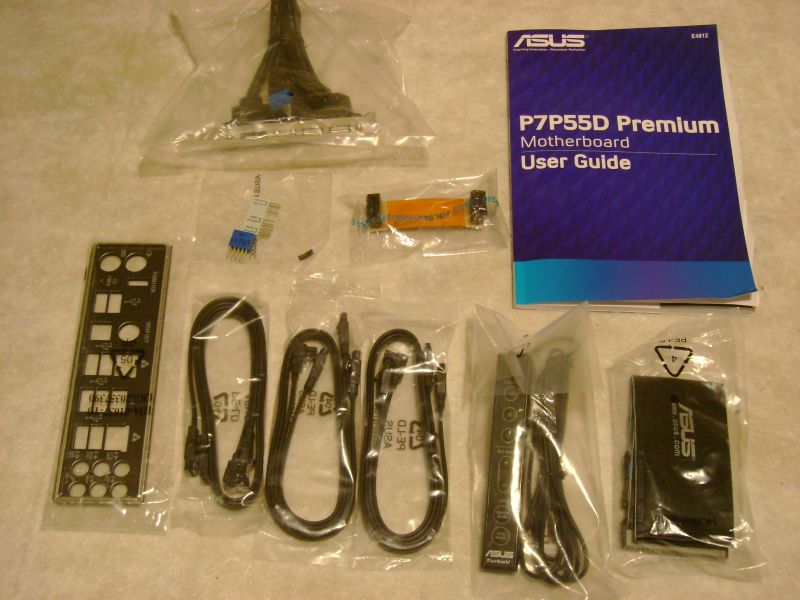
| Accessories | User’s manual 1 x UltraDMA 133/100/66 cable 1 x TurboV Remote 2 x Serial ATA 6.0Gb/s cables 4 x Serial ATA 3.0Gb/s cables 1 x 2-port USB and eSATA module ASUS Q-Shield 2 in 1 Q-connector 1 x ASUS SLI bridge connector |
| Support Disc | Drivers ASUS Update ASUS Utilities Anti-virus software (OEM version) |
| Form Factor | ATX Form Factor 12 inch x 9.6 inch ( 30.5 cm x 24.4 cm ) |
As you can see the new P7P55D Premium is one of the few new boards supporting 6 Gb/s on the new Marvell® 88SE9123 SATA controller.
The P7P55D Premium also plays host to an extensive list of features, ports, settings, and fine tuning software. It is quite obvious that Asus has intended this platform for enthusiasts intent upon overclocking their machine to its full potential. Given the ability for control over settings in the bios and through the added software we suspect that this is an excellent platform to accomplish just that.
What we find interesting is the combination of JMicron, Marvell, Intel, and even Via chipsets on this board. Perhaps Asus is trying a bit too hard here to extend the P7P55D Premium features to areas which it is not native to. We will see if this combination of chipsets and support affect its performance.
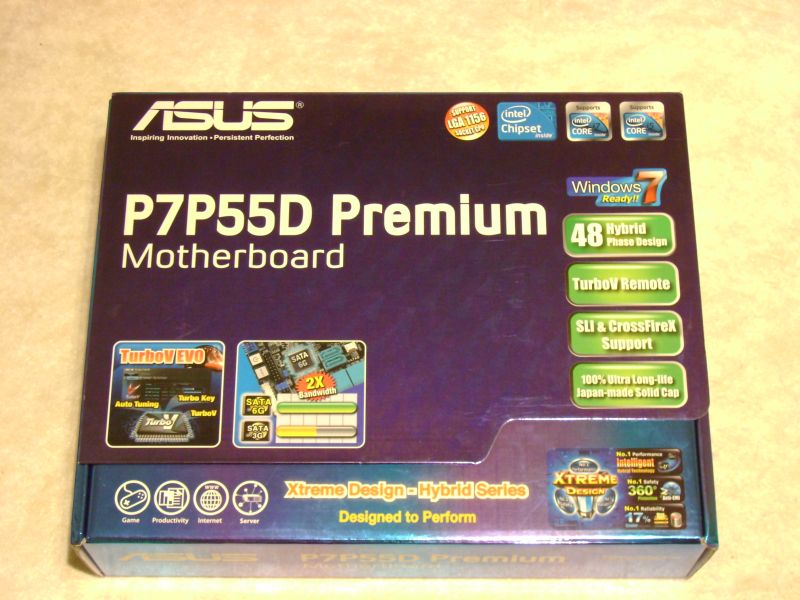
Box Art:
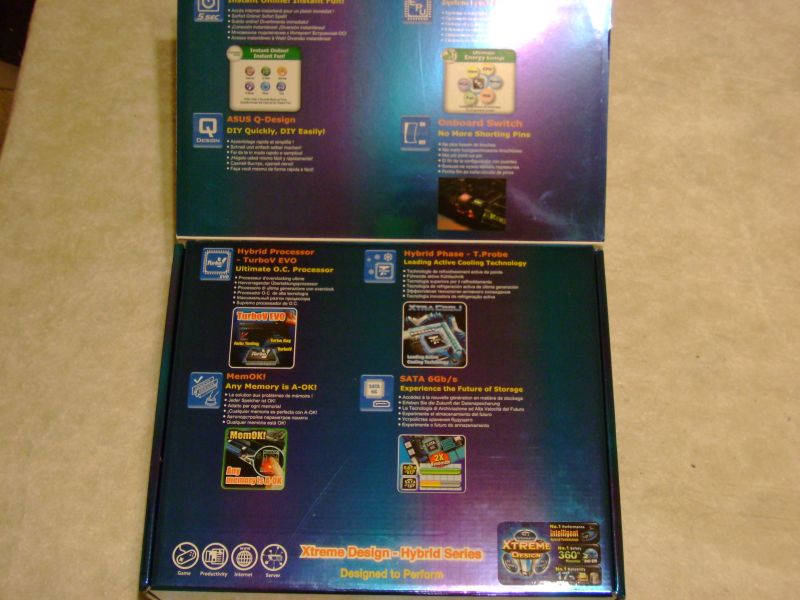
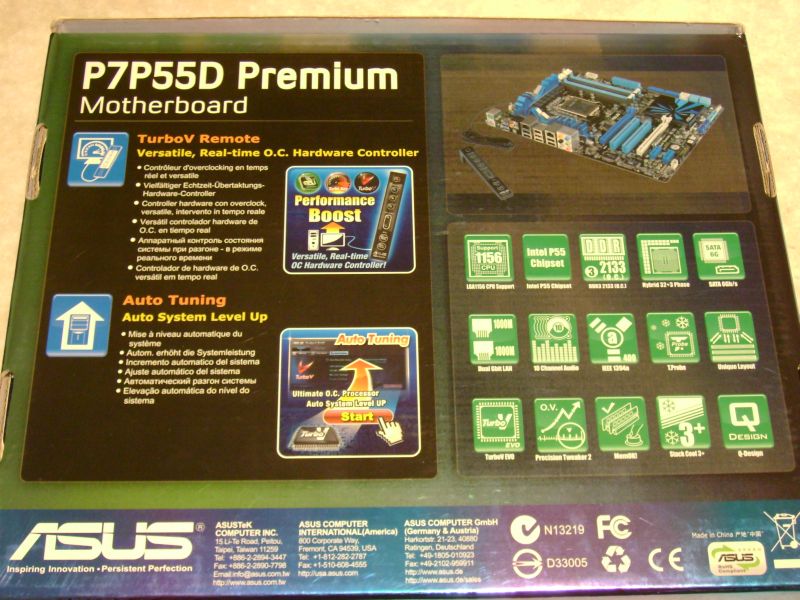
It is unfortunate how much stock people put in what the product packaging outside looks like when it is far more important that the product works as it is designed regardless of what it looks like. That being said, for your viewing pleasure Asus has designed a very reflective and eye catching box to house their P7P55D Premium Motherboard. With such a high performance board its not a wonder that Asus has placed extra emphasis upon the boxing of this product.
 |
 |
 |
 |
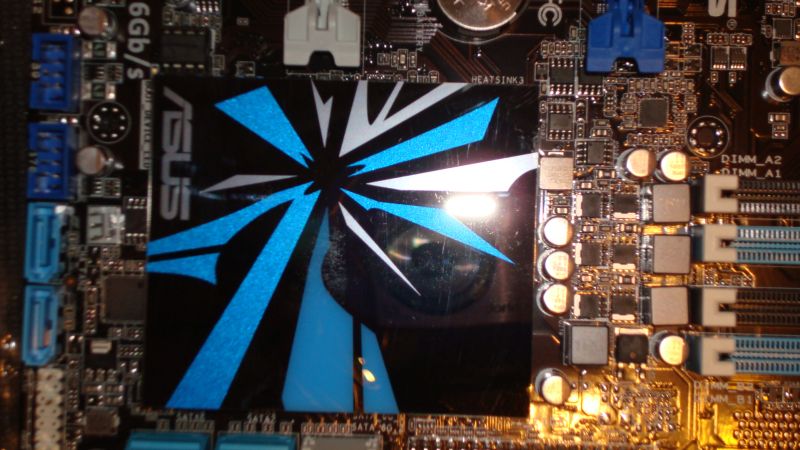
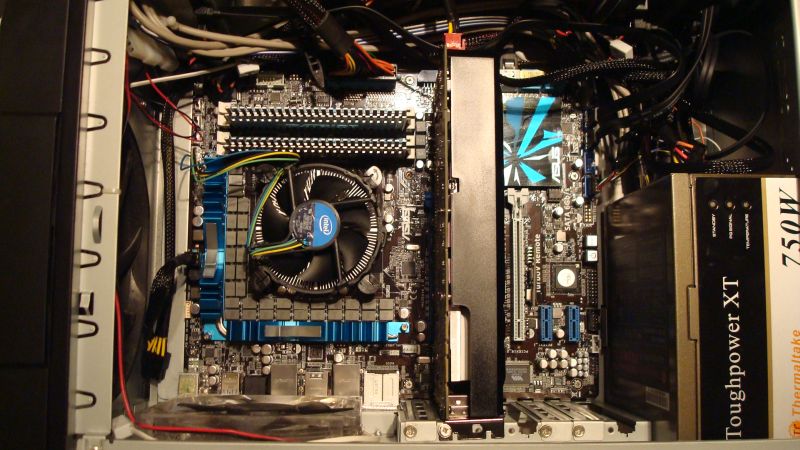
Right now your probably saying “oooooo that’s so shiny and amazing….” but just wait if you think that’s the the real treat then take a look at the board itself, to me the board itself is the work of art here.

The board itself comes with just about everything you will need to complete your build in terms of cabling, brackets, and connectors.
- 1 x UltraDMA 133/100/66 cable
- 1 x TurboV Remote
- 2 x Serial ATA 6.0Gb/s cables
- 4 x Serial ATA 3.0Gb/s cables
- 1 x 2-port USB and eSATA module
- ASUS Q-Shield
- 2 in 1 Q-connector
- 1 x ASUS SLI bridge connector
Our Test Build:
- Asus P7P55D Premium motherboard (obviously)
- Thermaltake ToughPower XT 750W Power supply
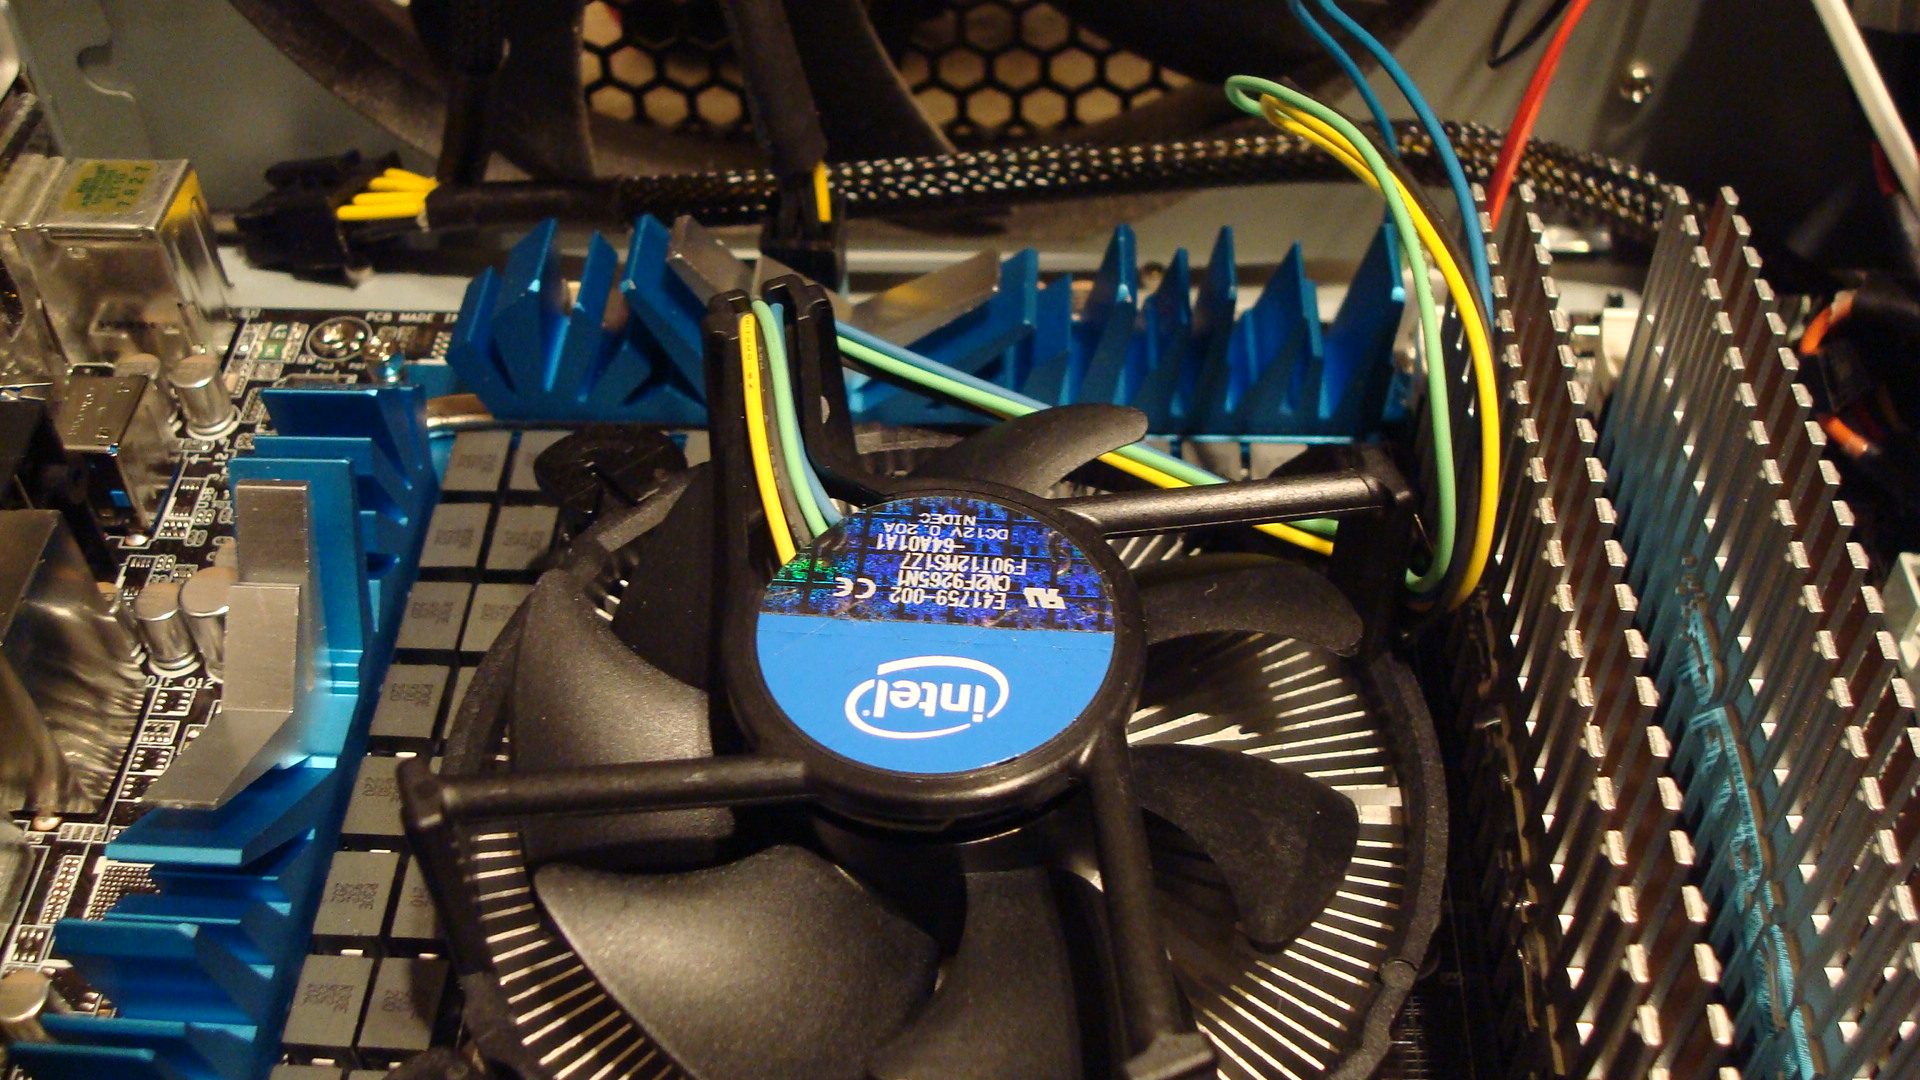
- Core i5 750 (stock cooler)
- Lite On iHES208 Blu-Ray drive
- Seagate Barracuda XT SATA III 6gb Drive that we reviewed recently.
- XFX Nvida GTS 250 graphics card
- 4GB (2x 2gb) Patriot Viper Ram ( DDR3 1333 )
- Windows 7 Enterprise.
- Antec Nine Hundred advanced gaming case (and older case but still full of cooling goodness)
- Artic Silver 5 thermal grease as per the instructions found here (arcticsilver.com)
* All tests were performed using Asus’s recommended settings for SATA III which was setting the Marvell 9123 controller to AHCI and shutting off the Intel C-STATE tech in the bios.

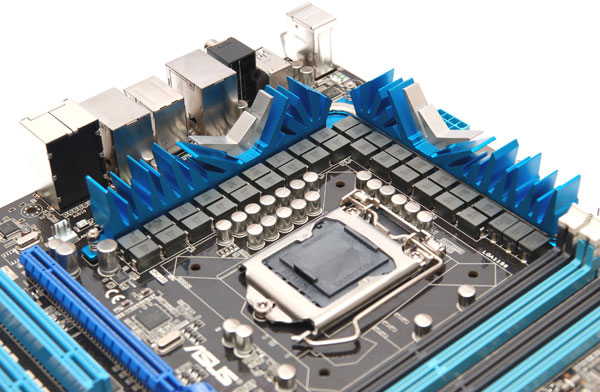
- The heatsink looks cool and is functional as well. This is the kind of attention to detail that users with case windows love.
Taking it in a step by step process goes beyond the scope of this review but in short.
- Install the CPU and cooler
- Mount the board on the standoff’s in the case
- Install drives
- Install the power supply and wire the board
- Install ram
- Install graphics card
- Verify all connectors and cables.
- ….
At step 8 which should have been first power on I ran into a slight issue and it was directly related to the ram, it appears that the motherboard requires a “compatibility tuning” before it will allow new ram to be used. This isn’t really an issue and if you read the instruction’s you will quickly find out what is going on. After the short “compatibility tuning” I was back in business.
Final step before attempting any overclocking is to install an OS and the Asus driver/utility disk. I chose Windows 7 for the main OS which when installed had all of the drivers pre-installed, for sanity and testing sake I installed the driver disk anyway. For the most part the install process when flawlessly though it would have been nice for Asus’s disk to have a install all with the ability to un-check certain components instead of installing everything individually, this is really just a minor nitpick but this should have been standard practice by now.
 |
 |
 |
Quick look at Express Gate:
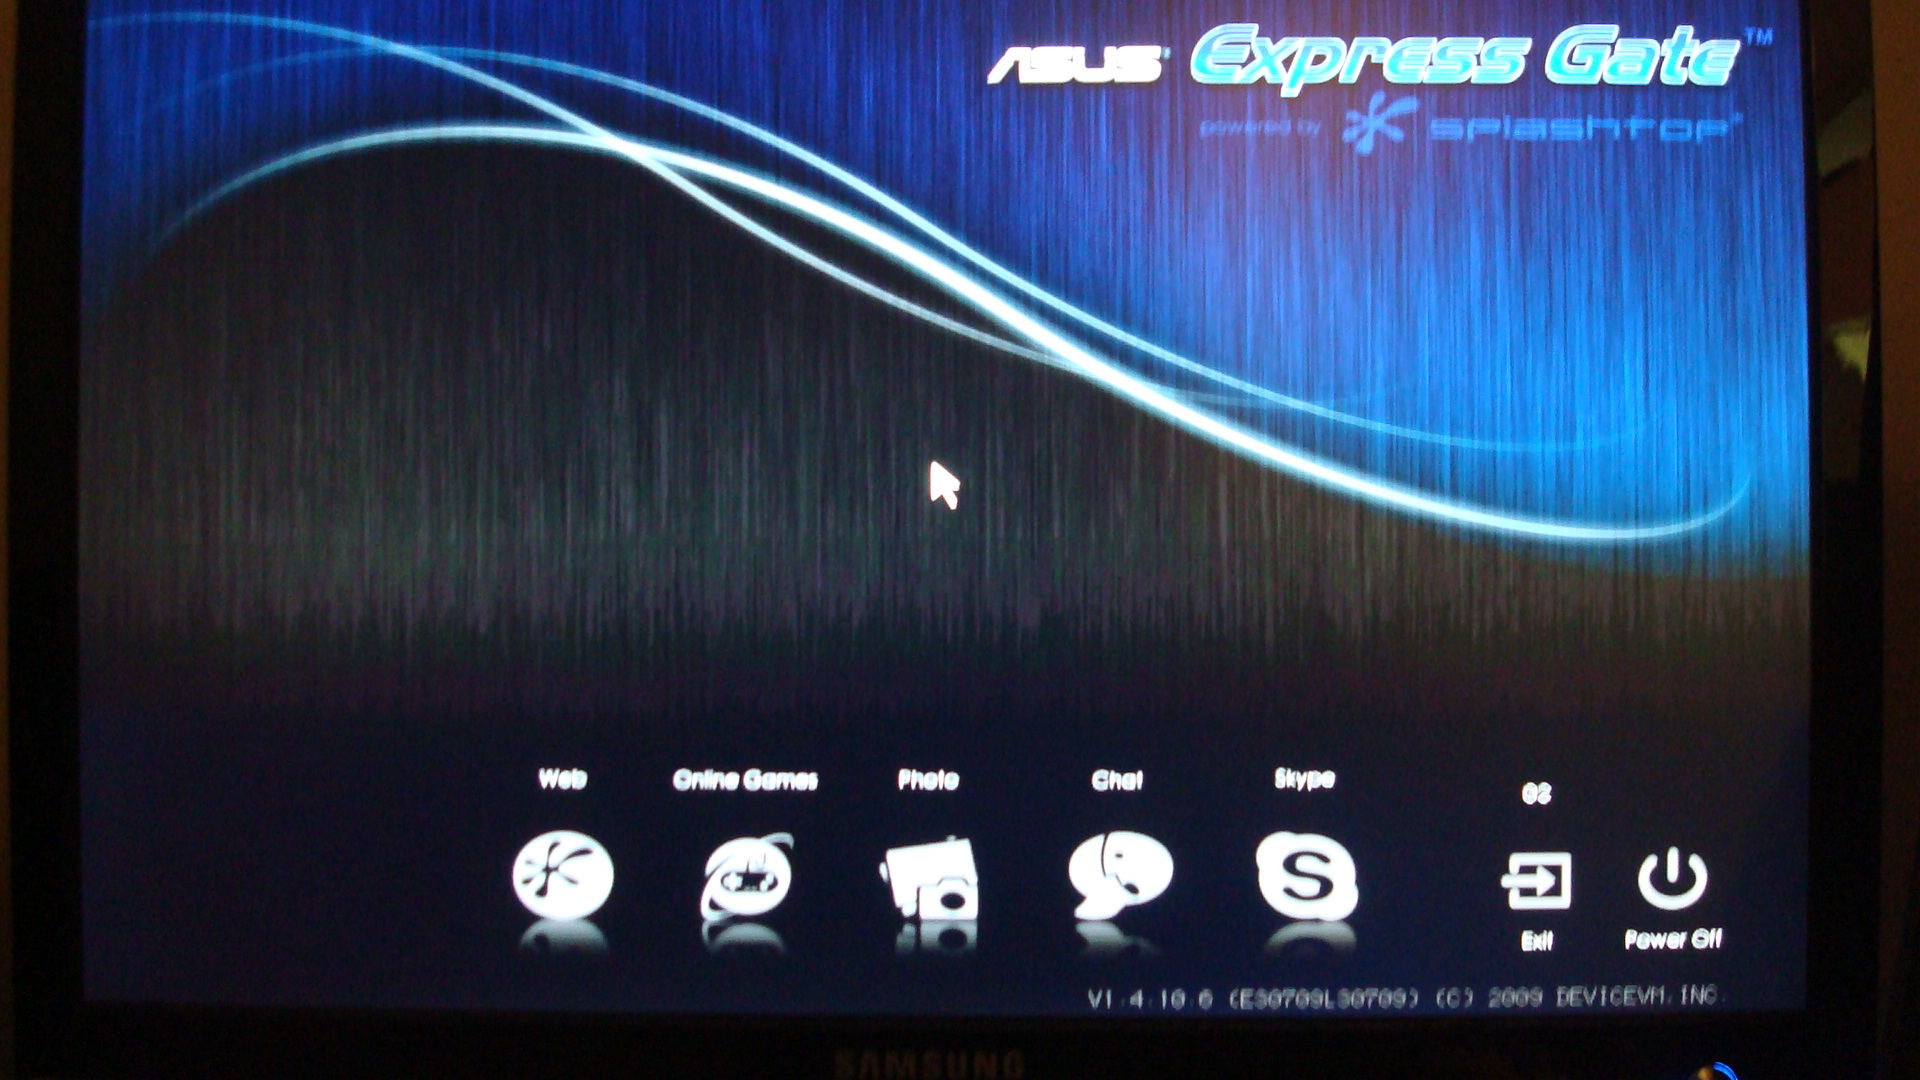
First thing I’d like to mention before talking about that actual bios is that the P7P55D Premium comes with Asus’s unique Express Gate feature. What Express Gate is essentially is an instant on Web OS named Splashtop based off a Linux kernel and stored on a flash memory chip that allows you to use web based applications via a stripped down Firefox web browser. The Splashtop OS was unveiled at CES 2008 and has since made its way into a number of devices produced by Asus.
Express gate aka Splashtop OS loading screen |
Main selection screen, all the buttons on the right go to the same place just preload certain pages. |
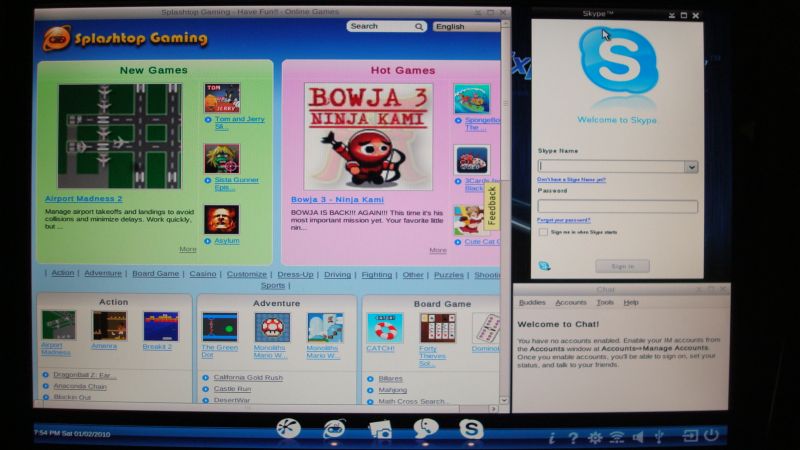
Web based flash games, Skype and pidgen chat client. |
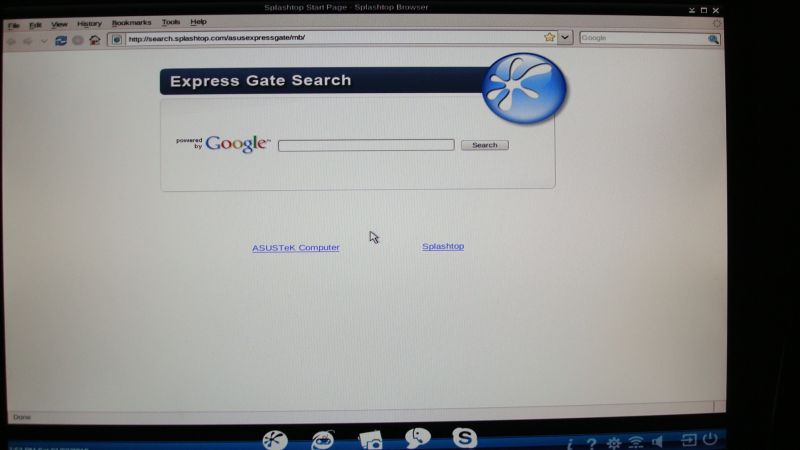
What appears to be a stripped down firefox. |
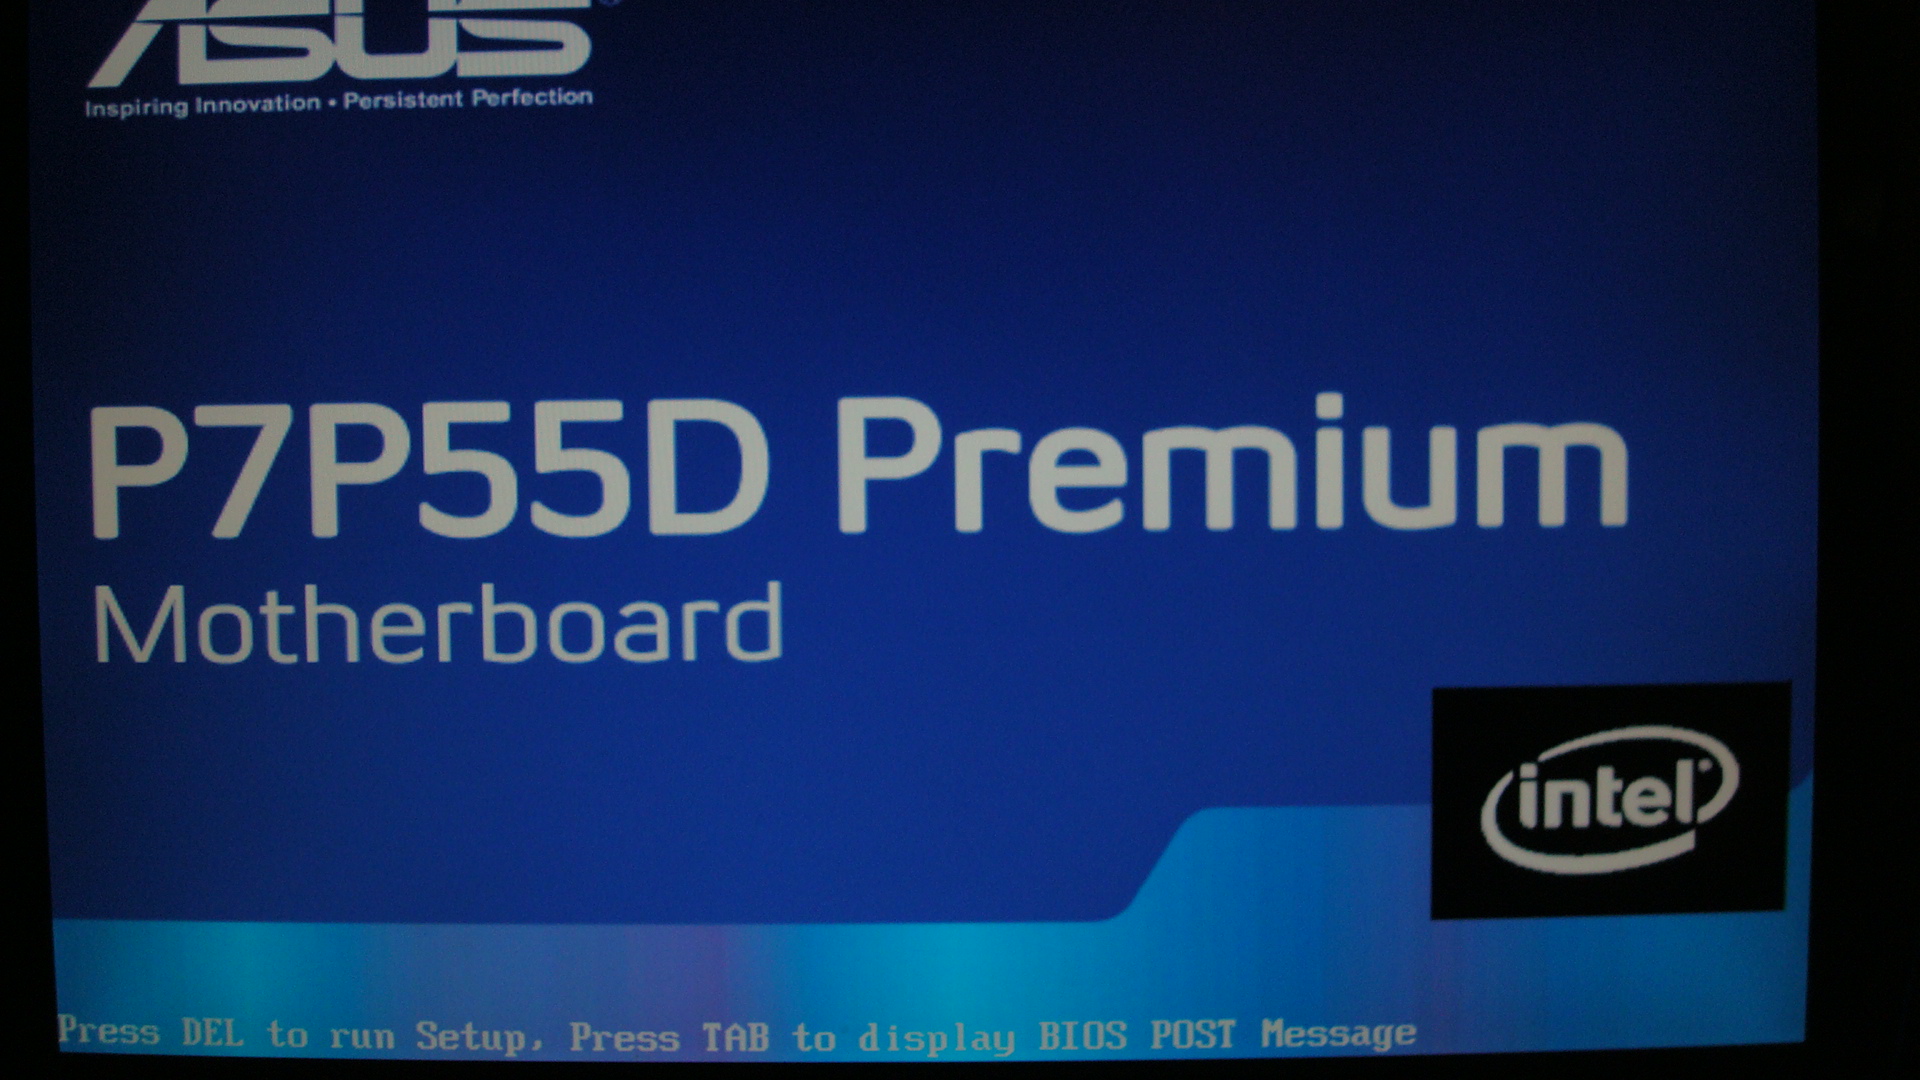
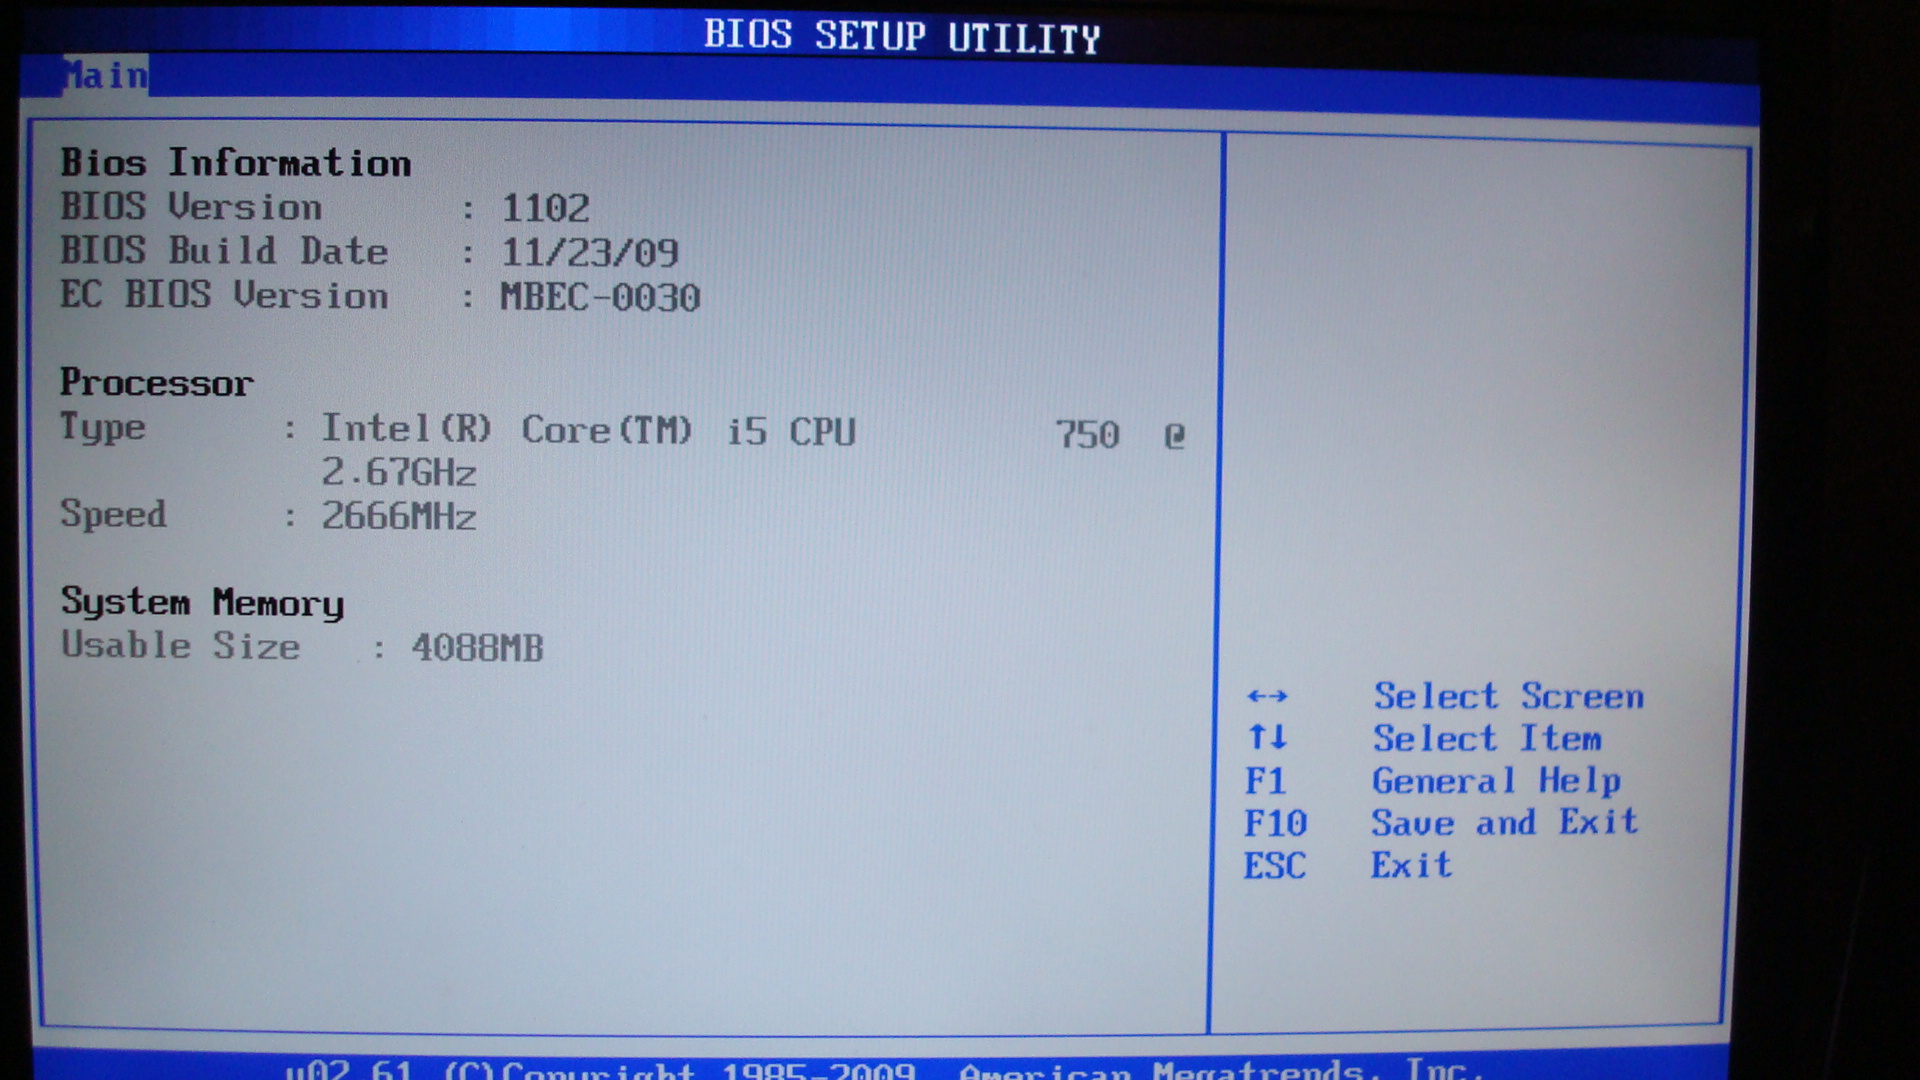
Bios Setup and Configuration
|
|
|
|
|
|
|
|
|
|
|
|
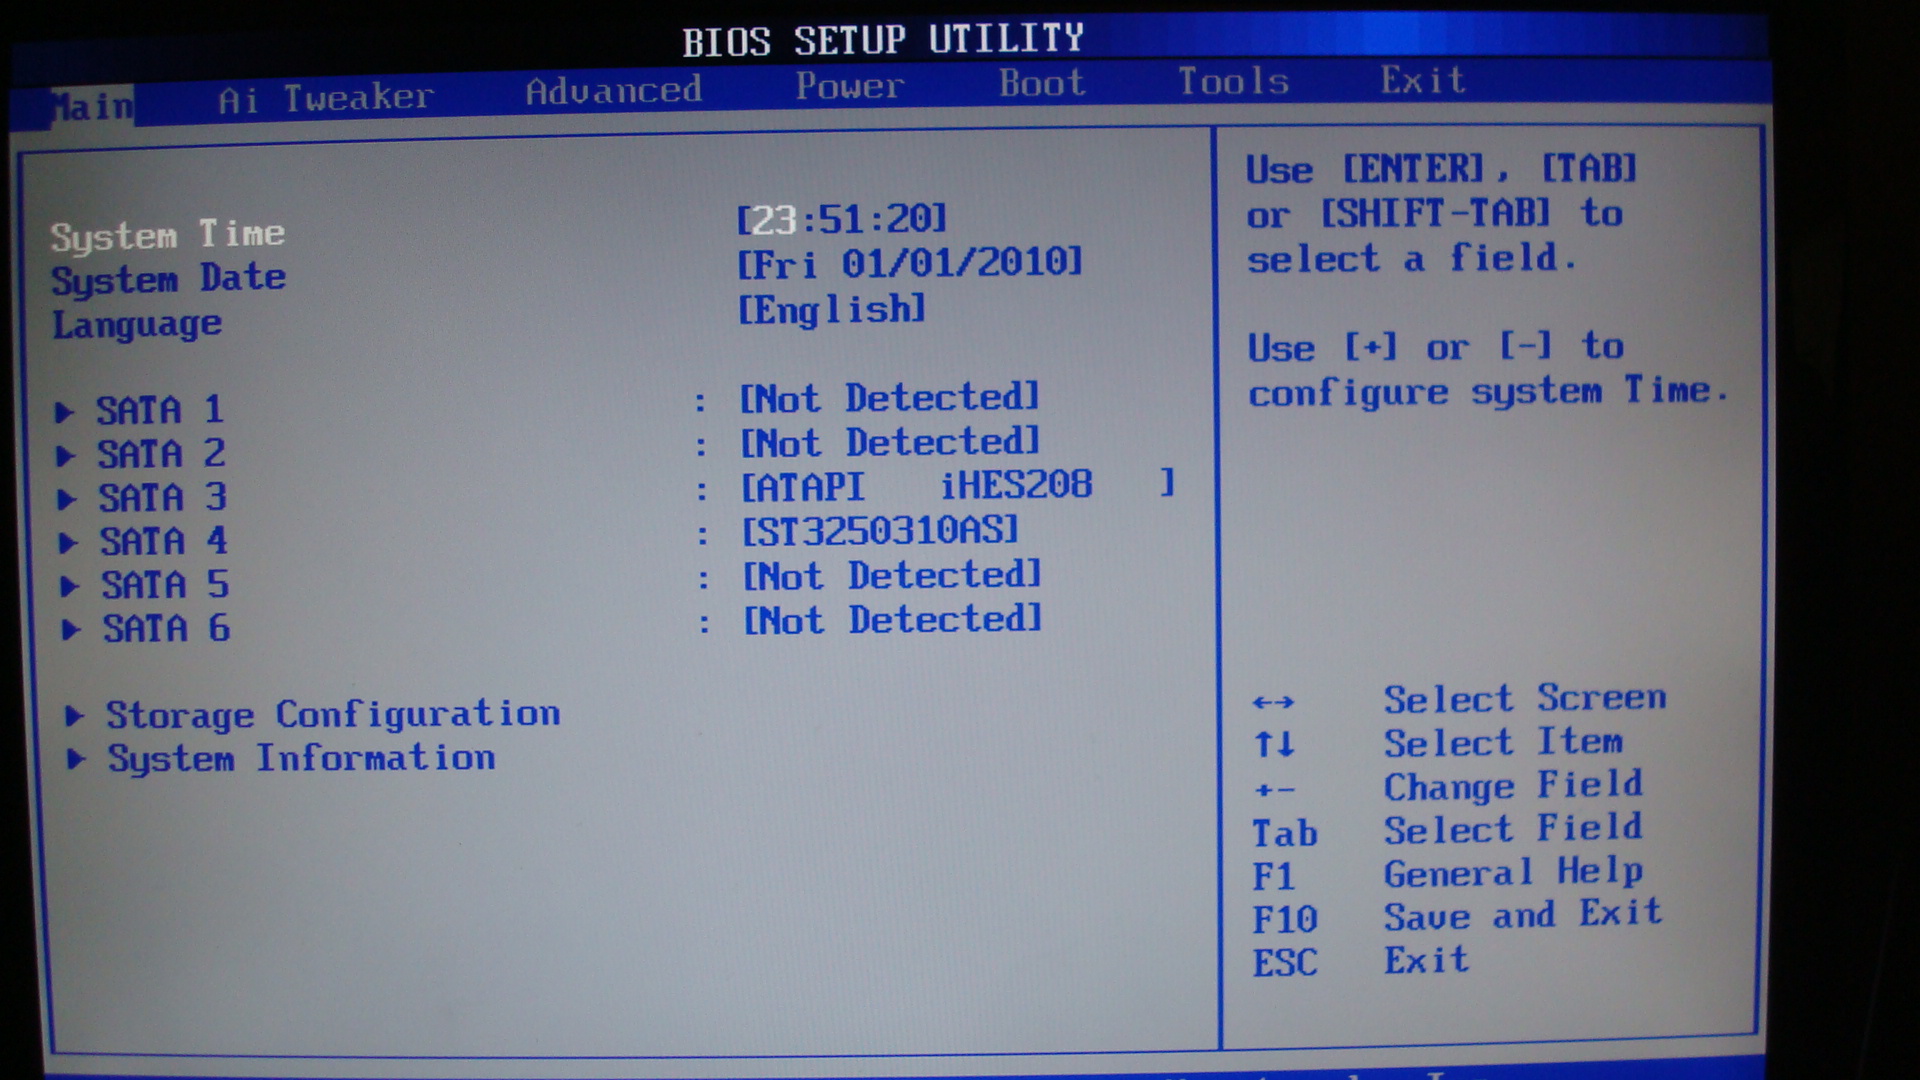

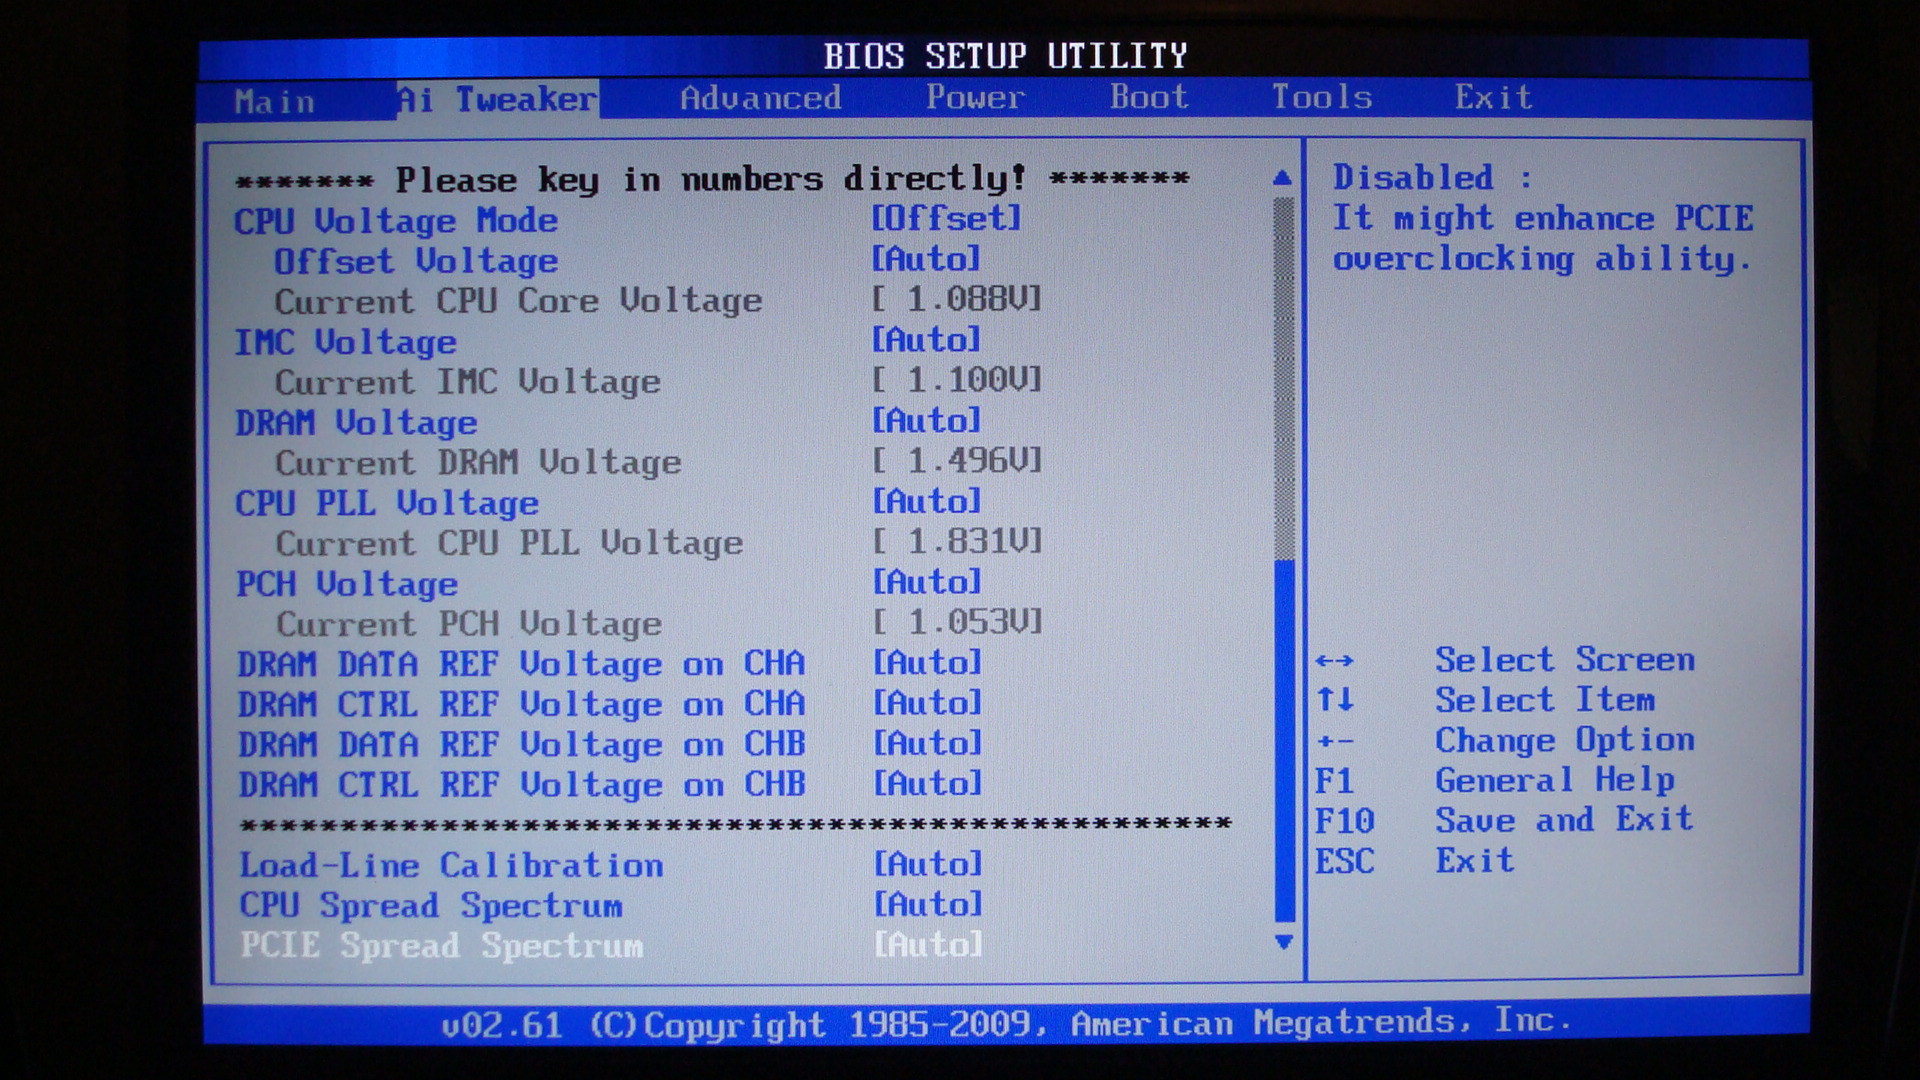
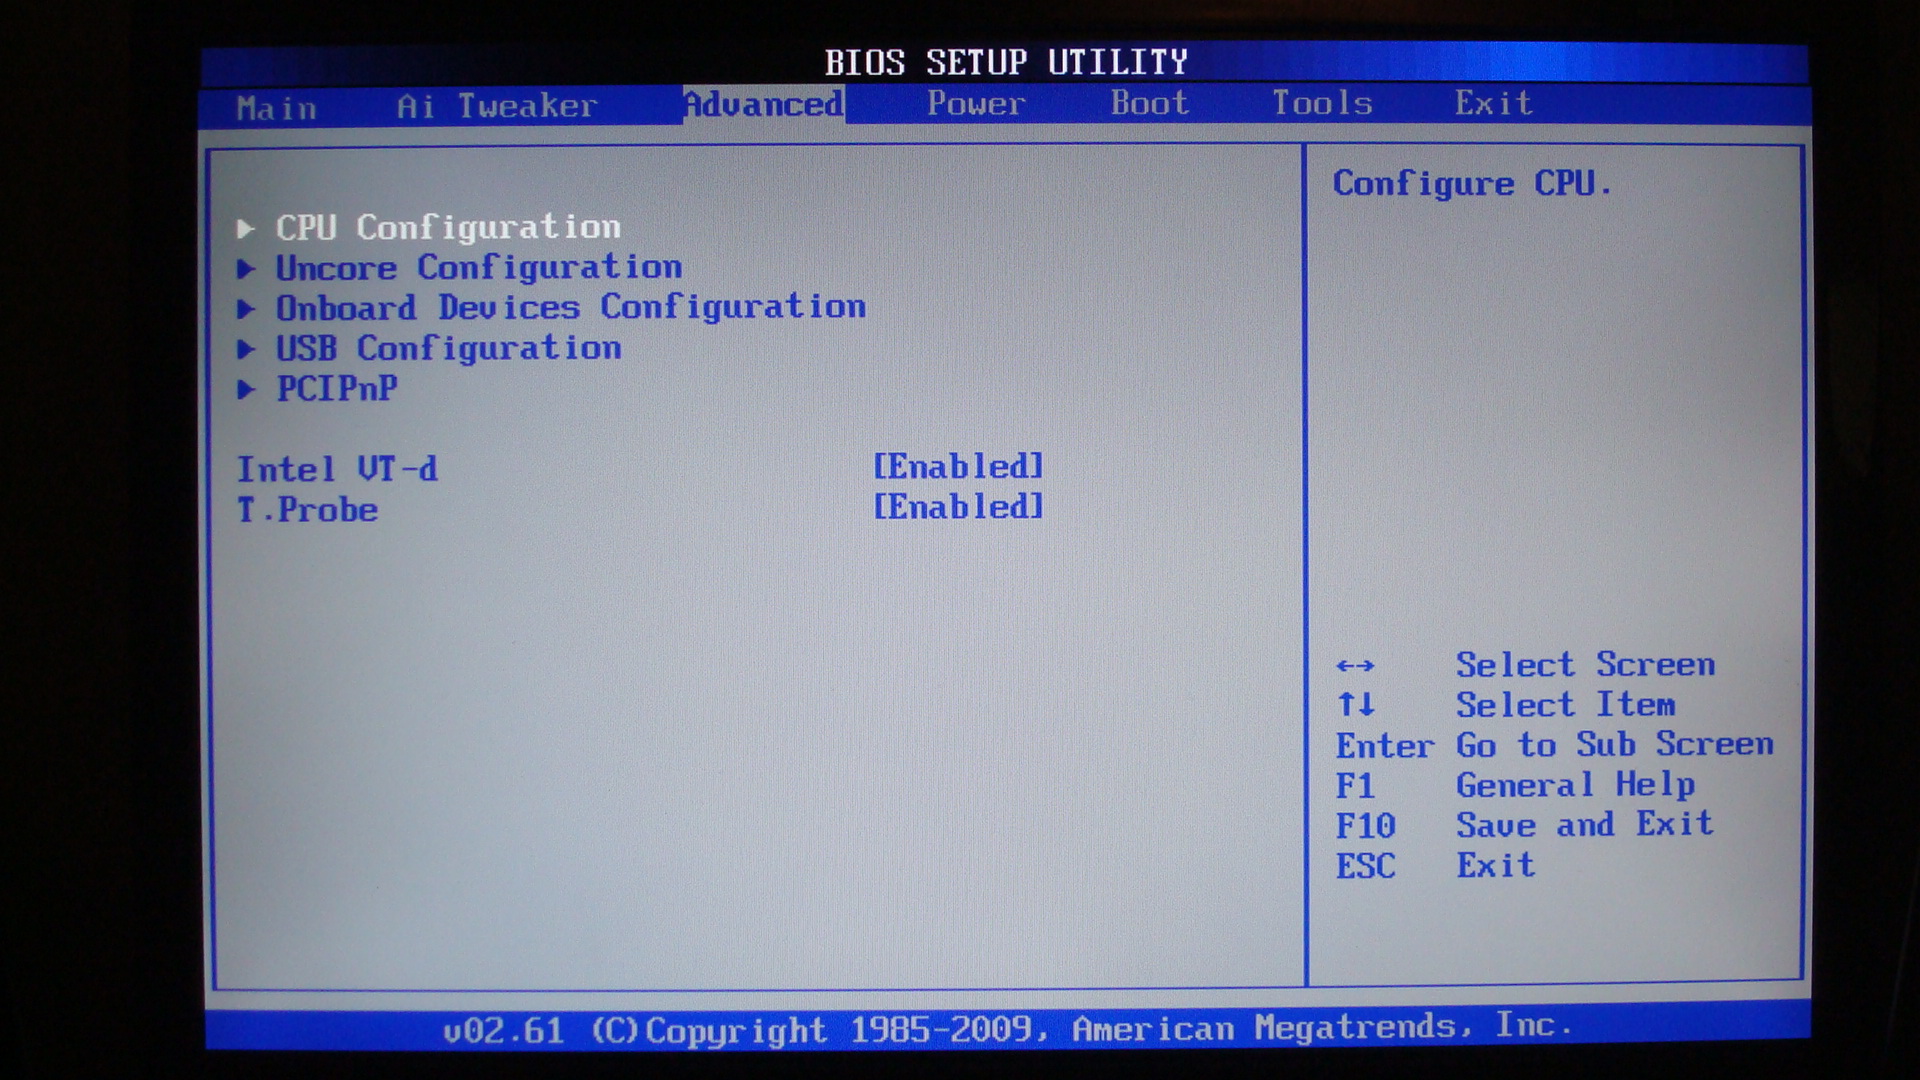
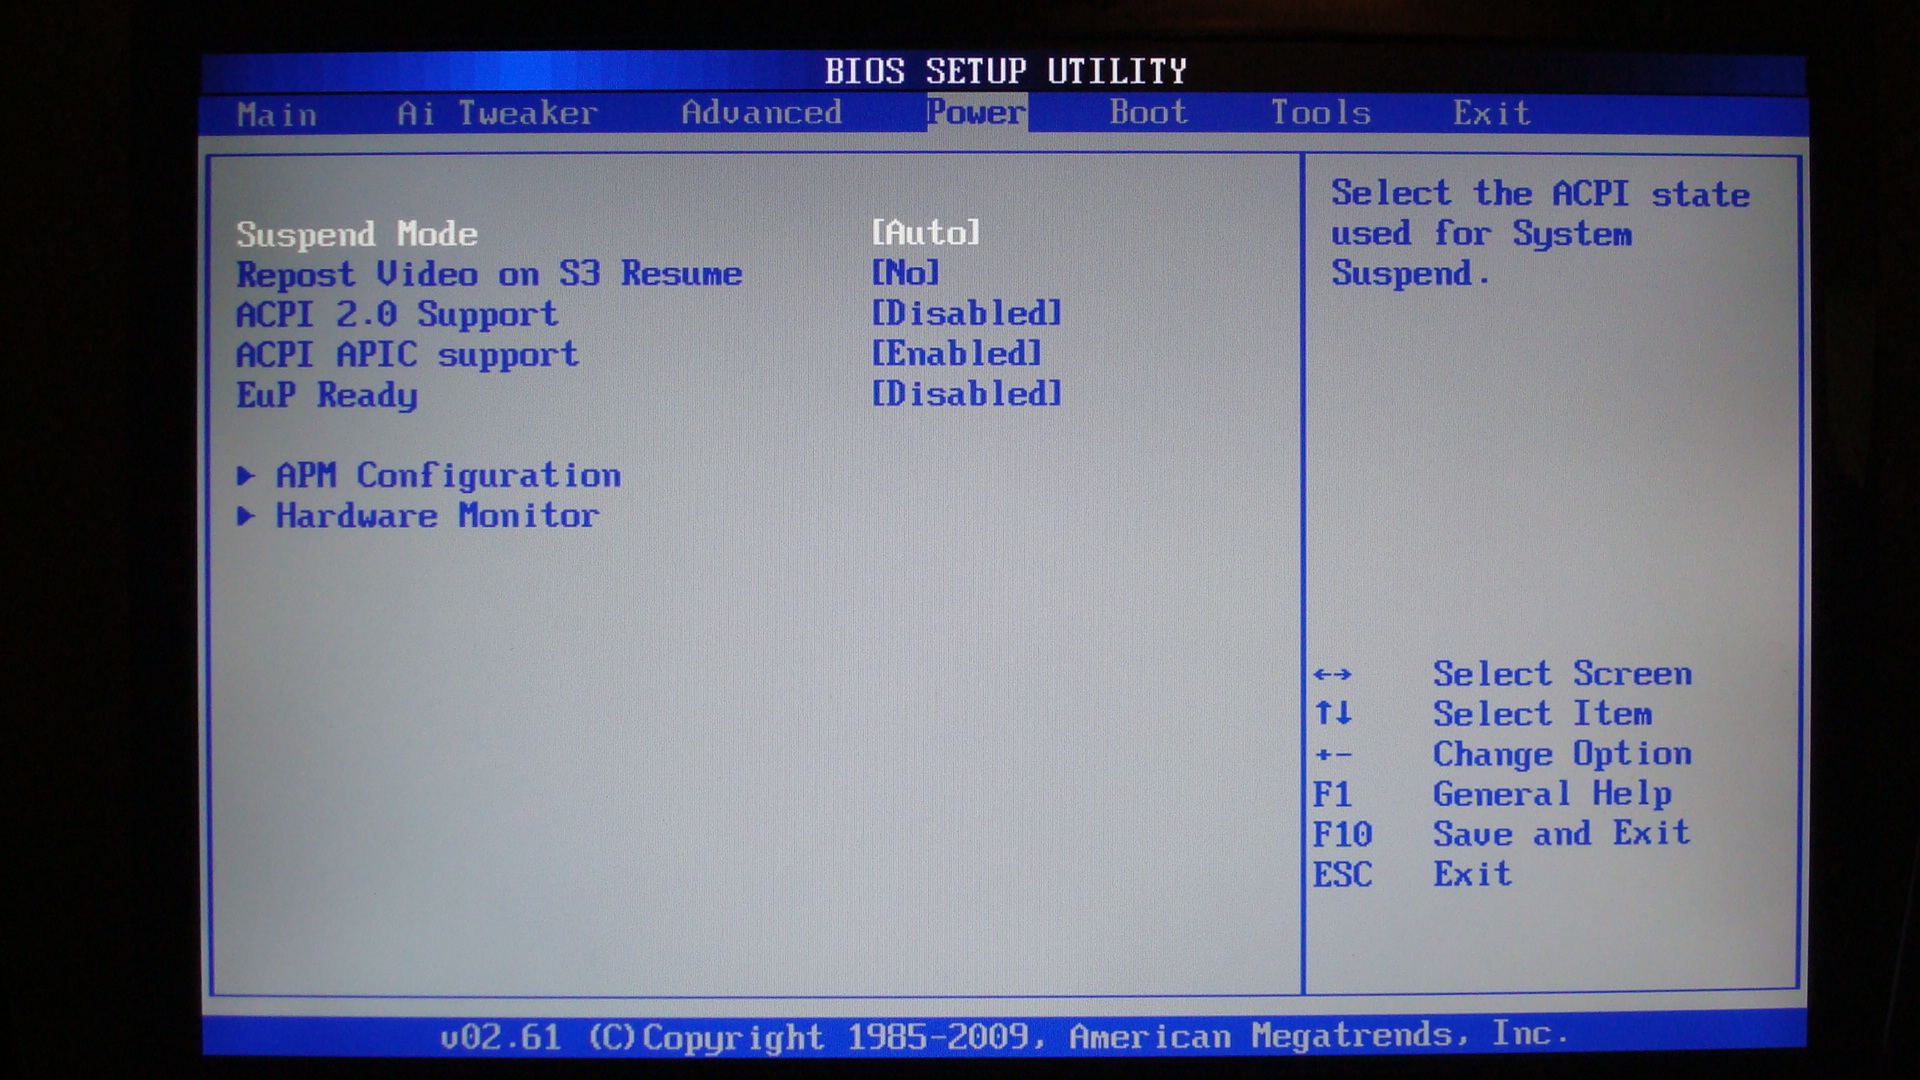
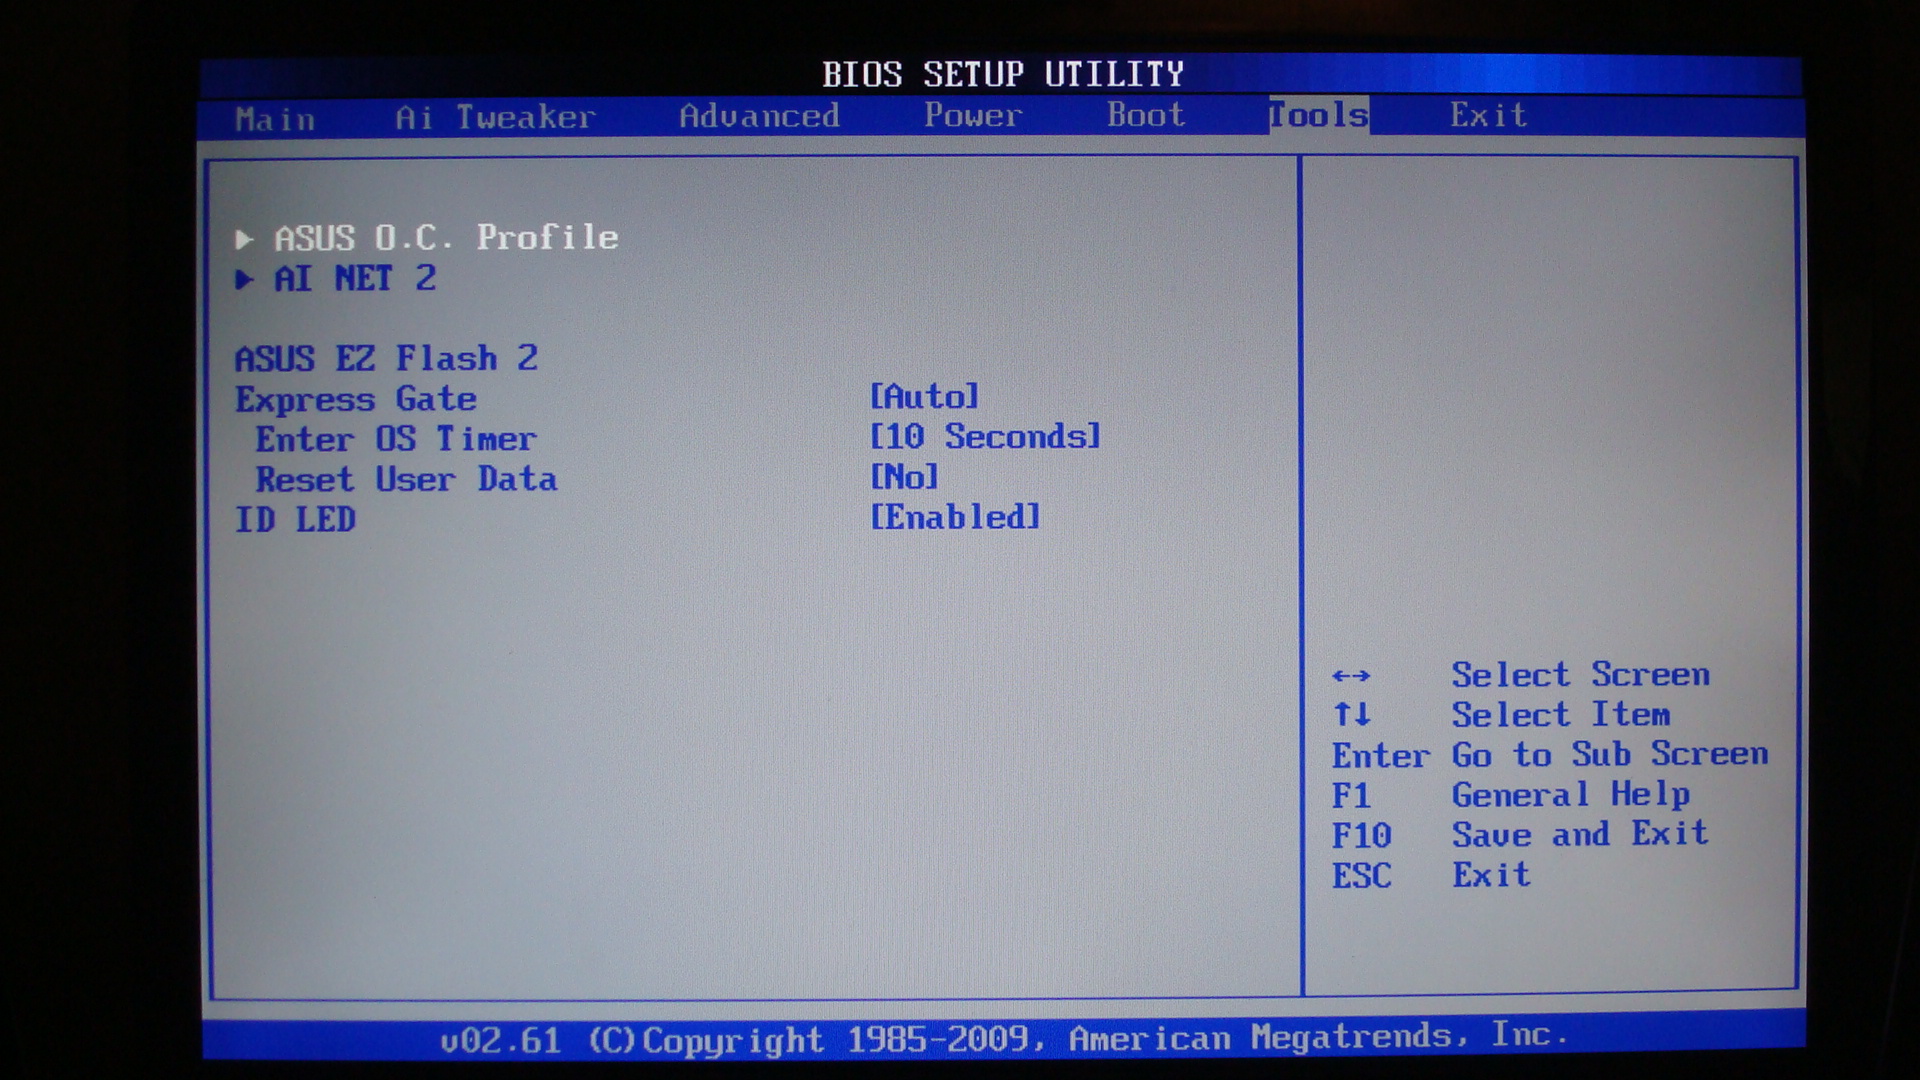
Overall the bios is very easy to navigate and everything is pretty well laid out. While the layout is easy to use and read the number of available features and options for customization is enough to make your head spin. It would be very easy for a novice to fry their board by modifying these settings randomly. As we mentioned earlier the P7P55D Premium is an enthusiasts board with expansive support and a wide array of features. While suitable for the average consumer we always suggest some caution before tinkering with settings you may be unfamiliar with.
It is apparent that Asus decided to tailor the bios for advanced users while novices are led more towards the windows based software for their overclocking needs who approach overclocking with much more care through the use of preset profiles.
While the option exists for extreme control over your overclock I opted to go with the Asus’s OC utility provided within the bios to test the functionality of a preset overclock as it is well known that you can achieve great results manually increasing voltage and bus speeds. Using the built in utility I achieved a jump from 2.67Ghz on the Core i5 to a lofty 3.71Ghz which is roughly a 39% overclock. The utility also overclocked the ram providing a 17% overclock from 1333 to 1560 all this was provided at a stable level my only issue so far is during testing and under duress the CPU reaches 61c though the fan ramps up and usually brings it back to within a reasonable level for a stock cooler this is pretty good, with more advanced cooling such as watercooling I feel it would be quite easy to reach 4Ghz+ and be completely stable.
Here is a screenshot showing the overclock we achieved on the P7P55D Premium with relative ease.
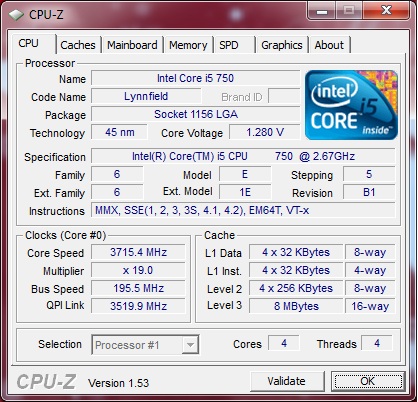
Changes to the OC Tuner Utility:
- Limited by turbo mode which is configurable but for this review was left at default.
- CPU ratio was increased to 19
- BCLK frequency was increased to 195 from 133
- DRAM frequency was increased to 1560 from 1333
- CPU voltage was set to 1.288
- DRAM voltage was set to 1.7
- Temp increased from 31c to 40c avg when idling
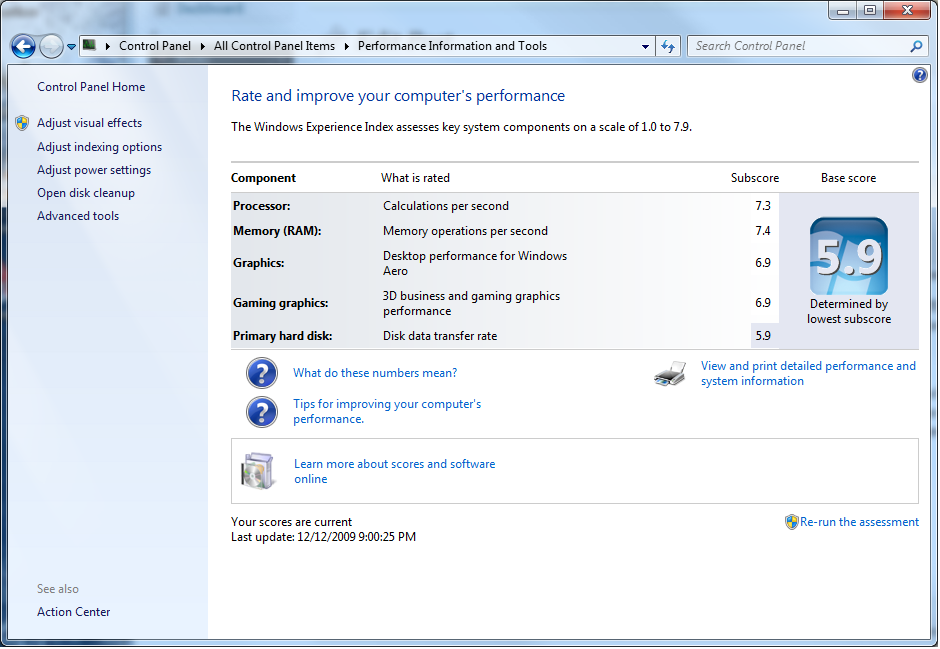
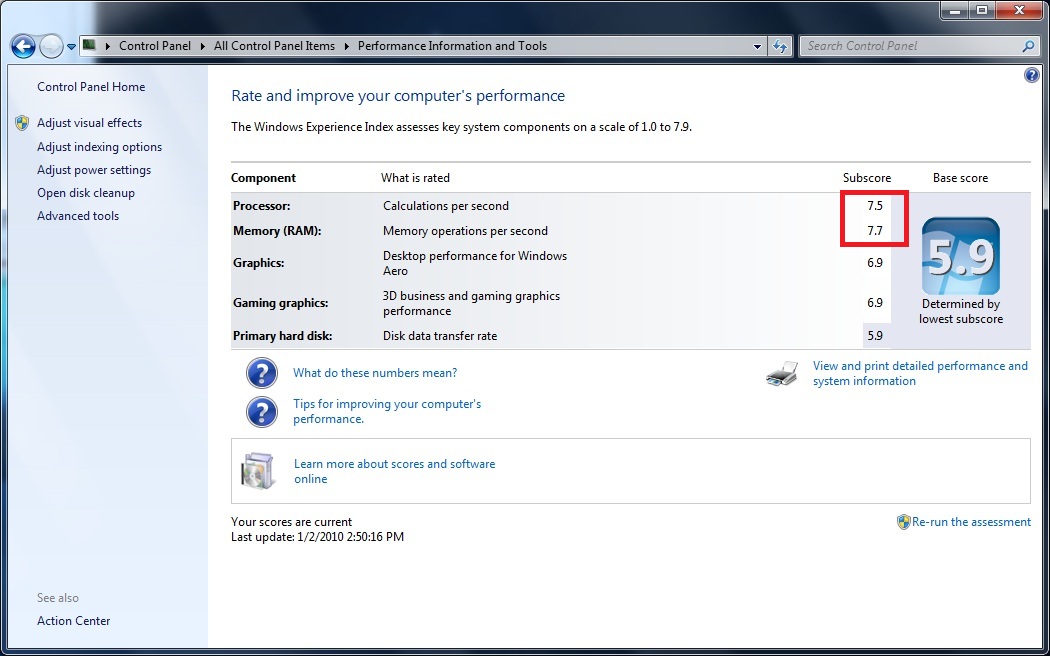
The increase in clock speed garnered a slight increase in the windows experience index score.
|
Before OC Utility |
After OC Utility |
One of the additional features of the P7P55D motherboard is the ability to overclock using a remote. The remote itself has several buttons, on the top we have a power button which will turn the system off and on. Below the power buttons we have 3 profile selectors which will overclock the system based on preset profiles that are configurable from within windows using the included software. Following the profile buttons we come to a more direct overclocking method allowing you to increase the bus speed in 1mhz increments from within windows. Lastly we have the ability to change the EPU to either manual mode or auto mode.
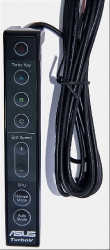
- TurboV Remote
During our use of the remote we experienced several issues. On default bios and program settings I received repeated hard locks using anything but the incremental increase of the bus speed, though using the incremental increase also resulted in a hard lock after about 35mhz increase. Personally while the remote is a great gimmick I would not use it for anything other than perhaps the on / off switch which works as designed but is only marginally useful. We have not performed extended testing of the remote functionality and it should also be noted that overclocking your system will depend highly on the components used. Your results will vary from ours and our test machine may have been limited due to RAM, video, hard drive or CPU.
Benchmarking
With the benchmarking I mainly wanted to see the performance gain of using Asus’s OC Tuner Utility which provided a 39% overclock of the CPU and a 17% overclock on the RAM. HD benchmarks where provided during our review of the Segate barracuda XT 2TB drive which can be found here.
All benchmarks were run on a stock i5 and on an overclocked i5 which is clocked to 3.71 using Asus’s OC Tuner Utility.
SiSoftware Sandra
SiSoftware Sandra is a software suite that has laser precise in targeting individual functions of a system for benchmarking I chose several system specific tasks to take a look at the performance when compared to similarly powerful systems
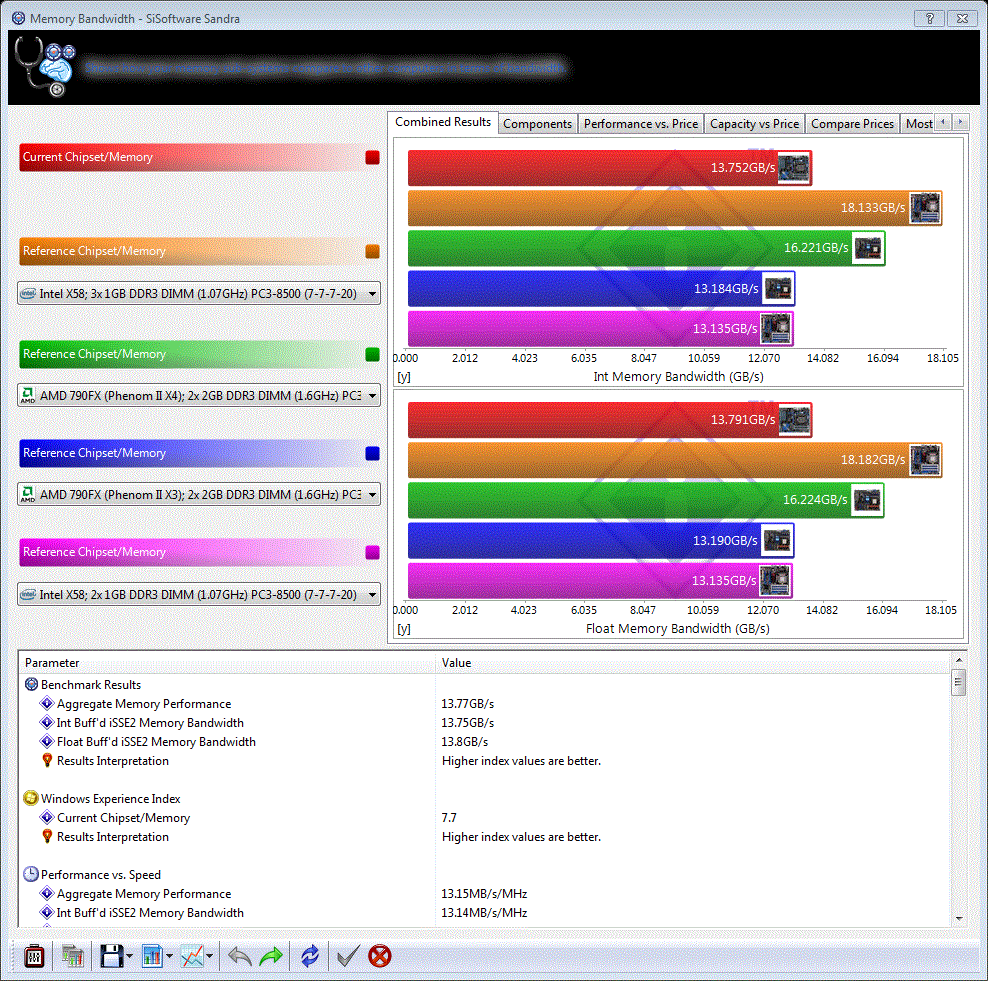
SiSoftware Sandra – Memory Bandwidth– How your memory sub-systems compare to other computers in terms of bandwidth
|
Before Overclock |
With Overclock |

Analysis:
As you can see overclocking the processor results in a significant corresponding boost in memory bandwidth. Our overclocked system moves from a near tie between 3rd, 4th, and 5th place to a 2nd place position with a healthy lead.
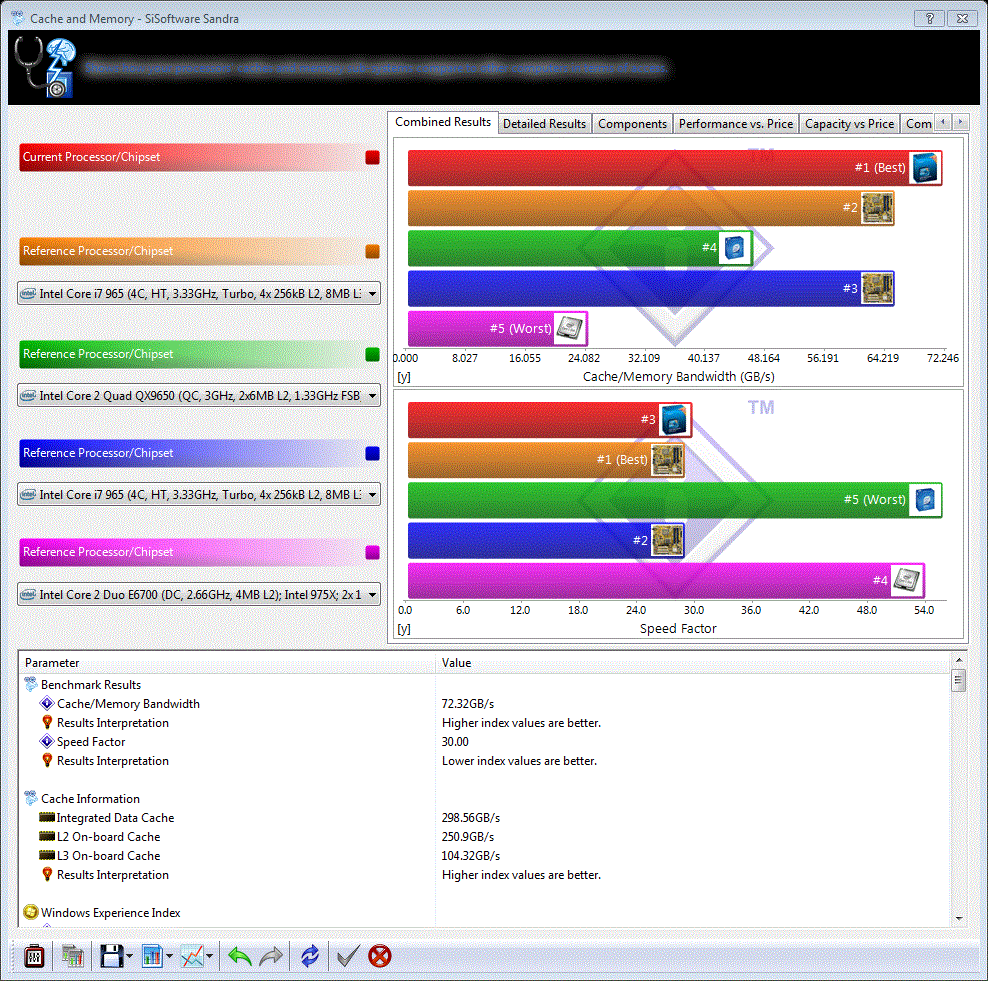
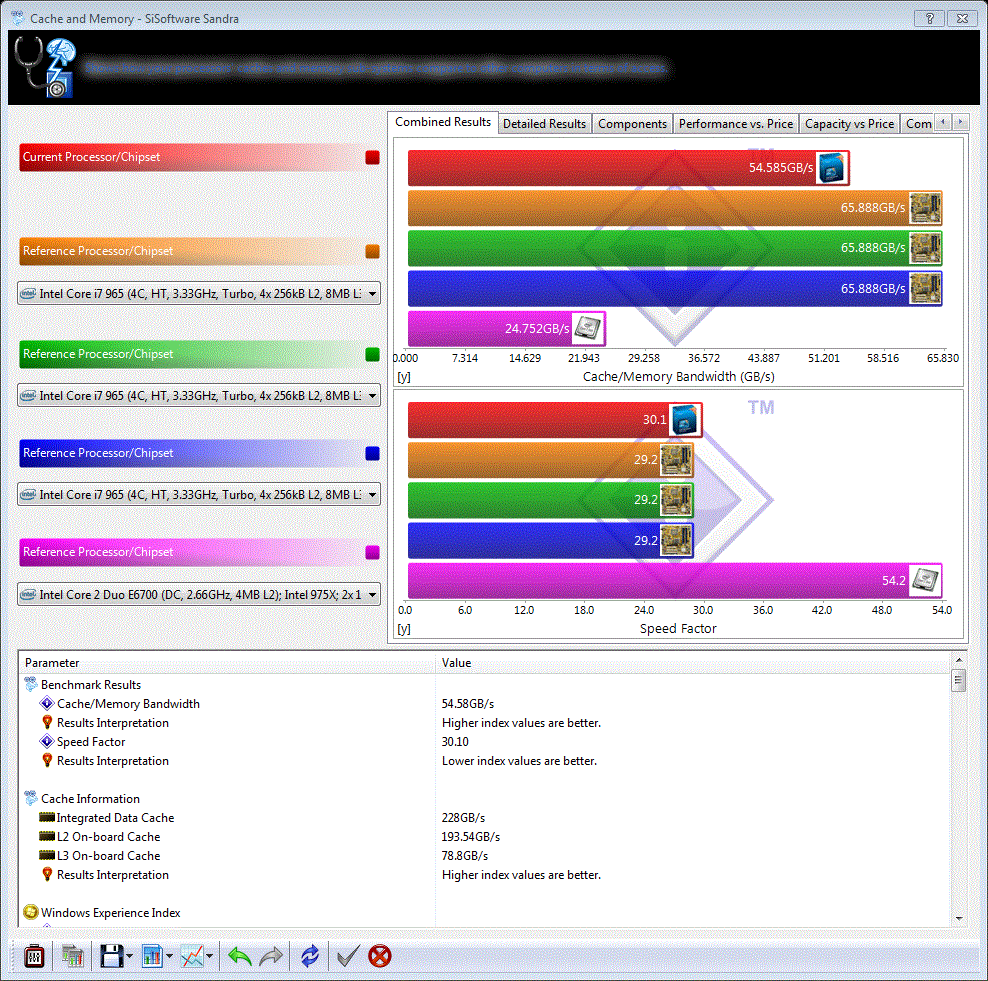
SiSoftware Sandra – Cache and Memory – How your processor’s cache and memory sub-systems compare to other computers in terms of access. This is a good showing of how well your system performs with applications that can load completely into memory, in modern systems utilizing 3+Gbs of ram this will be a majority of your applications
|
Before Overclock |
With Overclock |
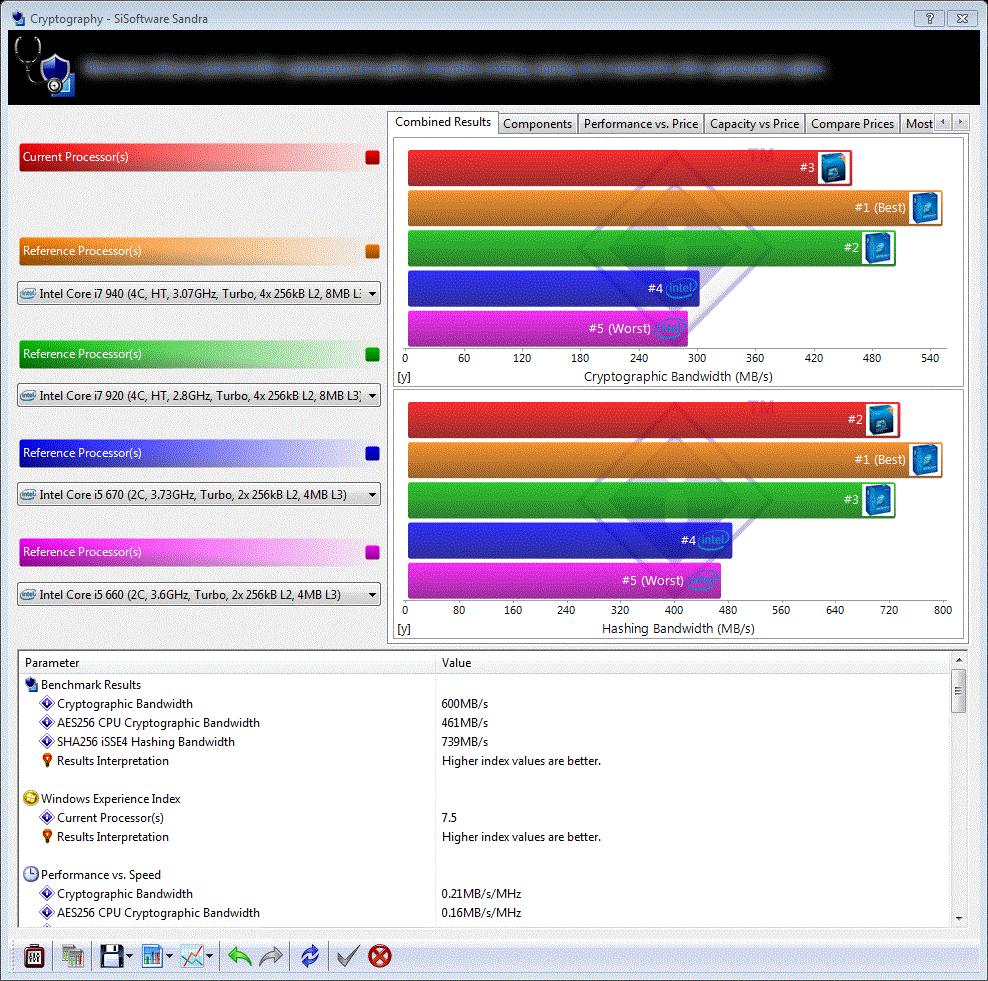
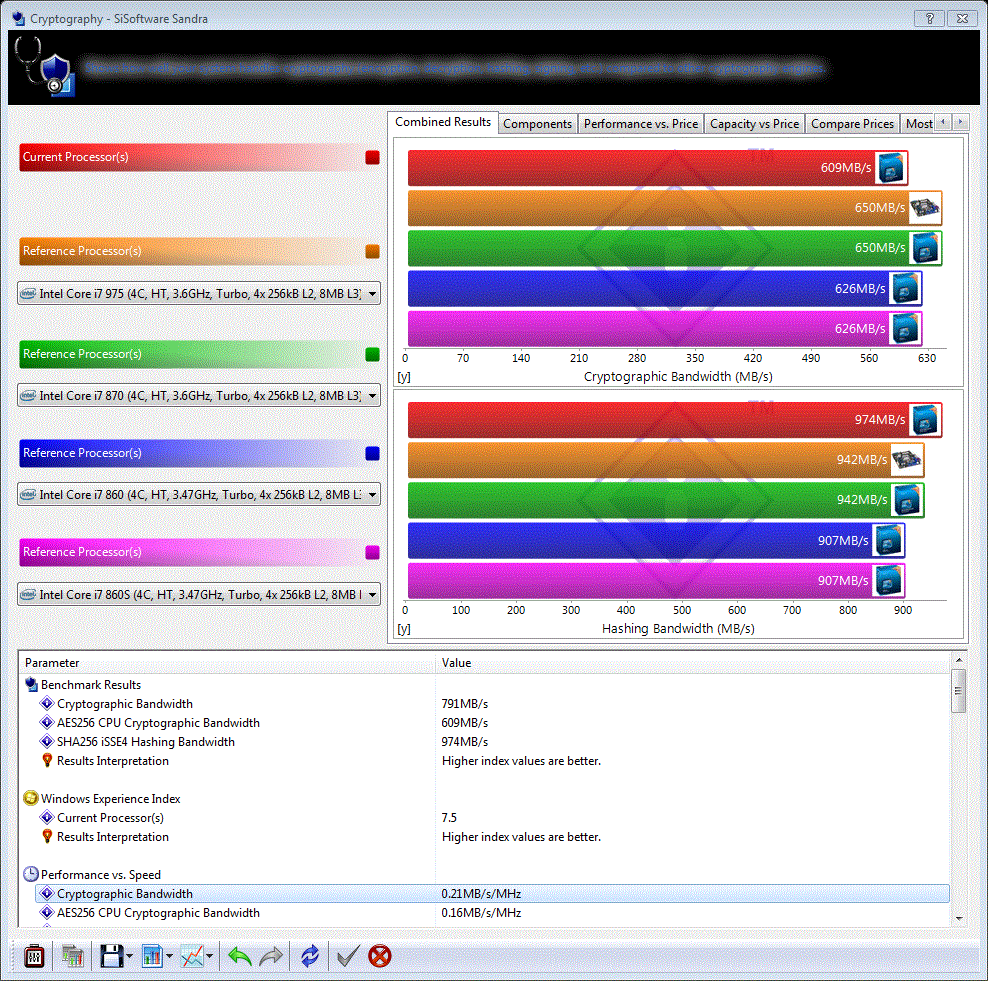
SiSoftware Sandra – Cryptography – How well the system handles encryption, decryption, hashing, signing…ect. This is benchmark is a good showing of how well your system handles high processor usage and memory intensive applications it is a good showing of a system under heavy load.
|
Before Overclock |
With Overclock |
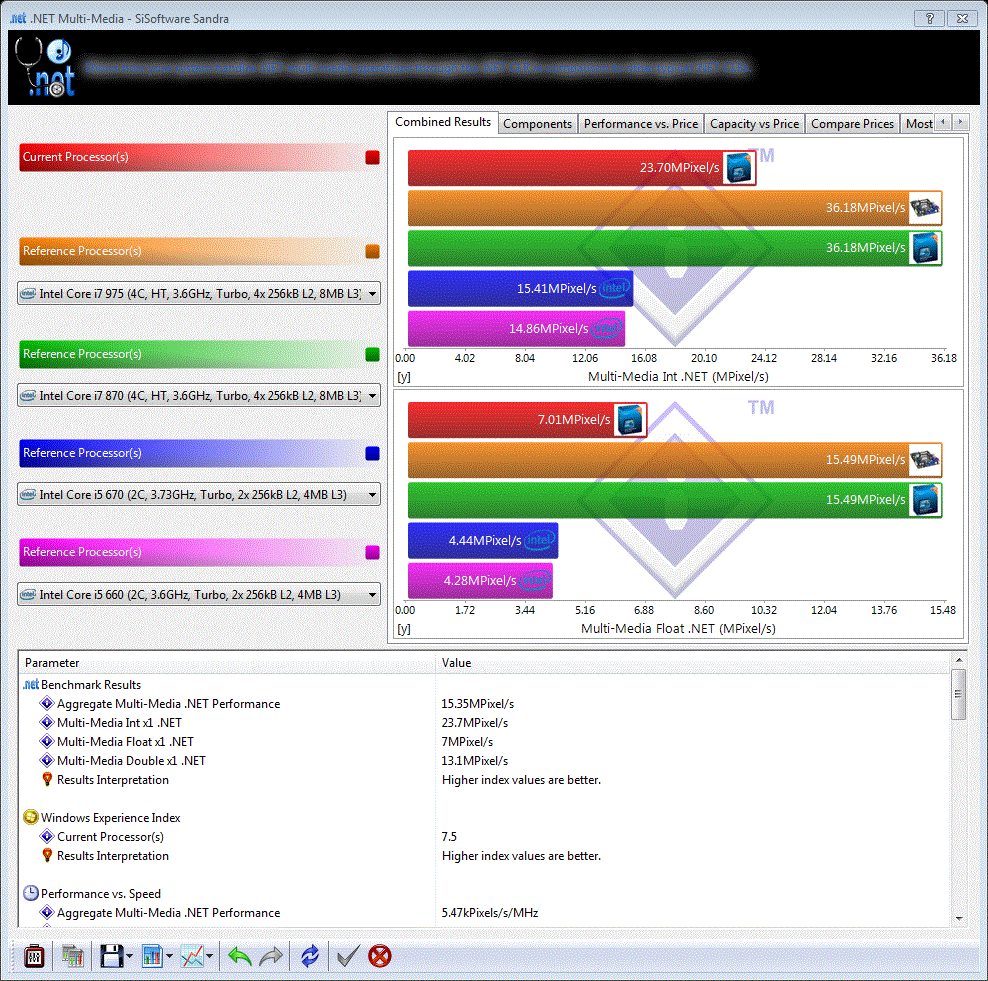
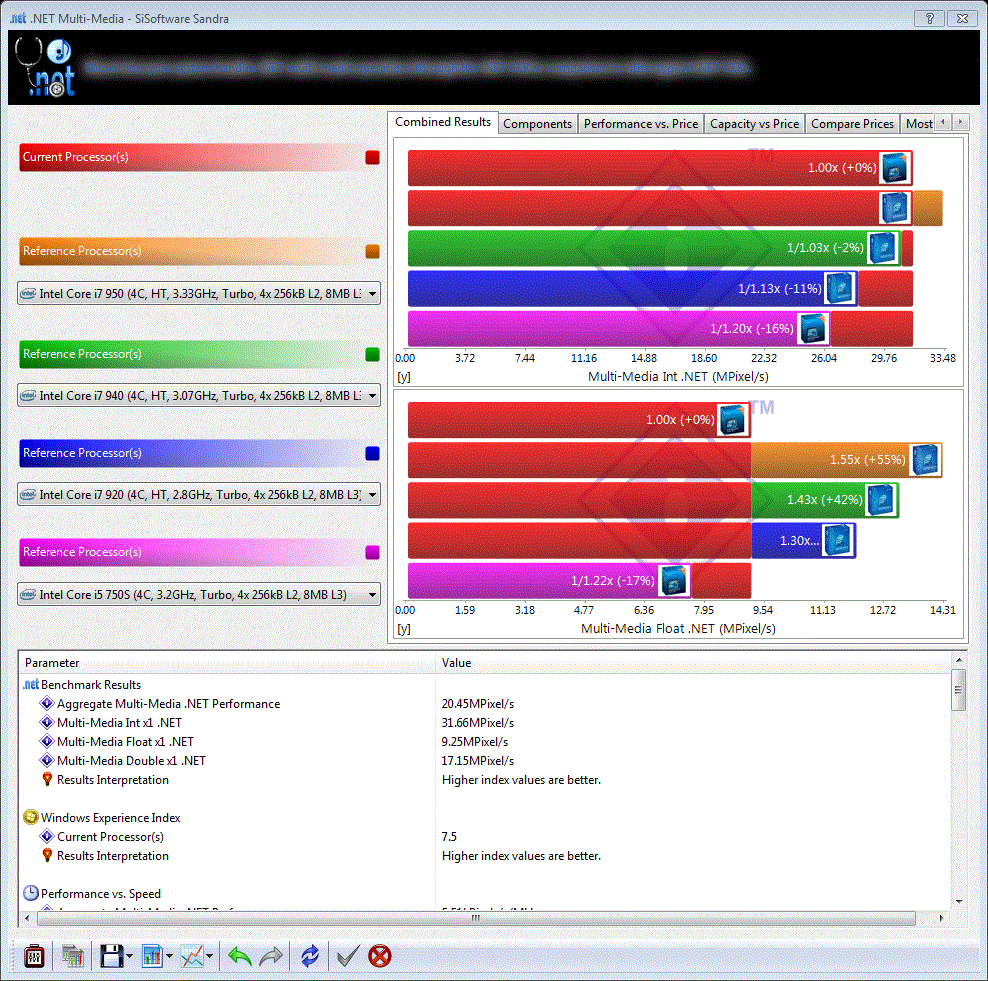
SiSoftware Sandra – .NET Multi-Media – How well the system handles multi-media operations through .NET. More and more applications are taking advantage of .NET because it makes it easier to write applications this works very similar to java in that it relays commands as a sudo virtual environment. While not a common benchmark it is a highly used environment for applications and shows a respectable speed increase with relatively minor overclocking.
|
Before Overclock |
With Overclock |
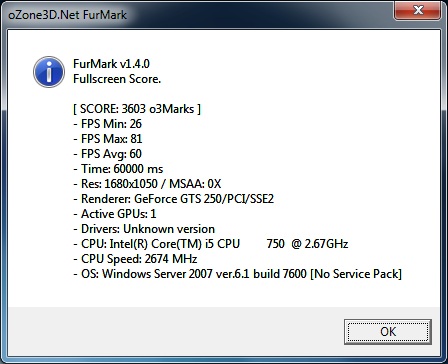
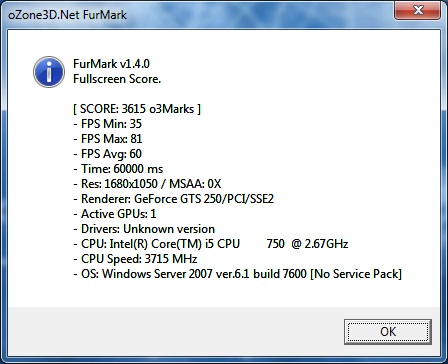
Furmark
Furmark is an OpenGL benchmark that uses fur rendering algorithms to measure the performance of the graphics card and the throughput between the RAM and the graphics card.
A lot of current games utilize OpenGL as do a lot of older games. The other benifit to this benchmark is that Linux currently does not have support for Microsoft Direct X as such Linux gamers require OpenGL
FurMark @ 1680×1050 ( Full screen )
|
Before Overclock |
With Overclock |
–~~~~~~~~~~~~–
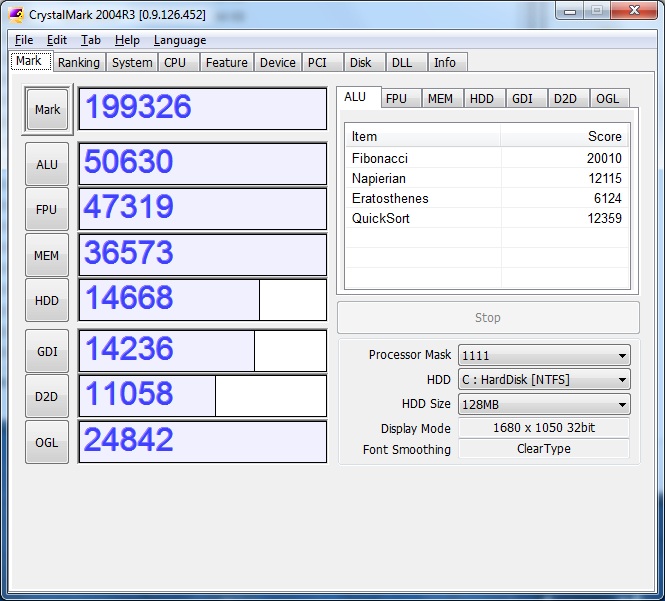
CrystalMark
CrystalMark is very thorough about its testing of the abilities of the CPU and the throughput of the memory and motherboard chipset. Crystal Mark is probably one of the most honest benchmarks as manufactures are not likely to have optimized for it. It is also an excellent choice for you the reader as it is free software that you can download and run on your system for comparison.
|
Before Overclock |
After Overclock |

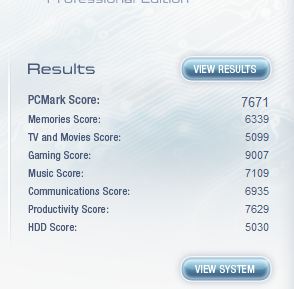
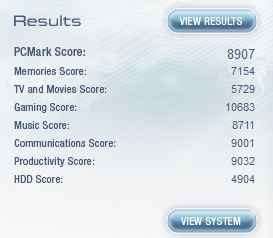
PCMark Vangtage
A PCMark score is a measure of your computer’s performance across a variety of common tasks such as viewing and editing photos, video, music and other media, gaming, communications, productivity and security.
|
Before overclock |
After overclock |
3DMark06
This benchmark will give us a good smattering of gaming performance.
|
Before Overclock |
After Overclock |
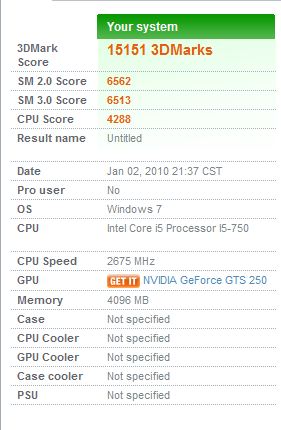
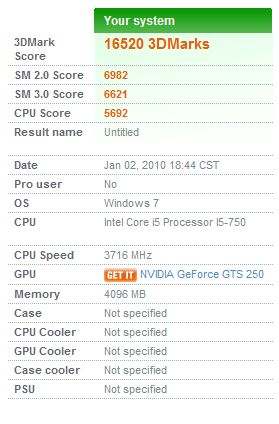
As you can see overclocking this system produces a healthy boost in the 3DMark score. of course upon further inspection you can see that most of this boost comes from the CPU score while only small increases are seen in the shader 2.0 and 3.0 scores. Essentially this boils down to what we already know about 3D benchmarks which is that they are much more dependent upon your graphics card than your CPU. We do realize some small increases in the SM 2.0 and 3.0 scores due to an increase in the ability of the CPU to process and relay information within the system as well as the increase in bus speed.
Analysis and Conclusion
Someone once told me that the P7P55D Premium was a board geared towards consumers, at the time I didn’t give this much thought but after reviewing this board I can certainly say that with the feature set available this board is most certainly a power user or enthusiast level board on par with a Republic of Gamers board. The reason I put this board so high on my estimation is that given a good cooling setup beyond just the stock cooler this board would easily hit 4ghz and given exceptional cooling it could hit the 5 GHz level. The P7P55D Premium has all the precise tweaking ability and feature set required to achieve maximum performance.
On the other side of the advanced user is a user who knows little about motherboard settings making overclocking difficult to achieve successfully. Thankfully Asus implemented a OC Tuner utility which we tested and which makes getting a decent overclock effortless. Beyond the overclocking aspect of this board the performance and stability that I received from it was great and in a lot of cases was not far behind a “higher end” i7 board at a similar clock speed according to SiSoftware Sandra, while these tests are benchmarks and not real world usage I know you will find that this board lives up to the price range which its being marketed to. At the time of this writing the P7P55D Premium has an online price tag of approximately $250. This may be a little steep for some users but honestly the performance that you get from it is worth it.
Given the excellent performance of the Asus P7P55D Premium, the expansive feature set, awesome level of fine tuning in the Bios, and additional consideration for average users we are happy to award it the Approved Hardware Award.


[…] Asus P7P55D Premium Motherboard @ TechwareLabs – Intel Clarkdale vs AMD Phenom II with 785G @ […]
[…] TechwareLabs has a review of the Asus P7P55D Premium Motherboard […]
[…] Asus P7P55D Premium Motherboard @ TechwareLabs […]
[…] Asus P7P55D Premium Motherboard @ TechwareLabs […]
[…] Asus P7P55D Premium Motherboard @ TechwareLabs […]
[…] Asus P7P55D Premium Motherboard @ TechwareLabs […]
[…] Round-Up (10/01/10) Motherboards Asus P7P55D Premium Motherboard @ Techware Labs Misc Patriot Gear Box Network Device @ RBMods GlideTV Navigator Review @ DragonsteelMods Sound […]
Social comments and analytics for this post…
This post was mentioned on Twitter by ztechsales: Asus P7P55D Premium Motherboard | TechwareLabs http://bit.ly/7wYpyr…